The biggest risk for a new model isn’t a bad photo; it’s being a physical liability on a set filled with expensive, fragile equipment.
- A professional studio is a technical workspace, not a stage. Every surface and cable has a purpose and a cost associated with it.
- Mastering spatial awareness—understanding where your body is in relation to the gear—is more critical than memorizing poses for getting rebooked.
Recommendation: Shift your mindset from being the “talent” to being a proactive member of the crew. Your primary job is to be safe, aware, and ready, which in turn allows the photographer to create great images.
Walking onto a professional photo studio set for the first time can feel like stepping into another world. The bright lights, the seamless white background, the hum of equipment—it’s exciting. But for a studio grip like me, that excitement is secondary. My focus is on safety and efficiency. To me, that pristine environment is a carefully arranged workspace, a minefield of delicate gear and potential hazards. New models, full of energy and focused on their performance, are often the biggest variable in this controlled space.
Many guides will tell you to “be professional” or “have a good attitude.” That’s baseline. It won’t save you from tripping over a $1,000 tether cable and pulling a camera to the floor, or from cracking a cyclorama wall that costs a fortune to repair. The real key to success and, more importantly, to getting hired again, isn’t just about how you look in front of the camera. It’s about how you move and behave when the flash isn’t firing.
This guide isn’t about posing. It’s about mastering the physical space. It’s about developing a grip’s mindset: an instinct for spatial awareness and a deep respect for the equipment. We’re going to move beyond the platitudes and get into the specific, physical rules of the studio. This is the practical knowledge that separates an amateur from a professional who understands that a smooth, safe shoot is everyone’s responsibility.
In the following sections, we’ll break down the most common and costly mistakes new models make on set. From the unforgivable sin of stepping on the cyc curve to the subtle art of blinking in sync with the strobes, you’ll learn the unwritten rules that keep the set safe, the crew happy, and your career moving forward.
Summary: Cycloramas and Cables: A Professional Model’s Safety Guide
- Why Stepping on the Curve of the Cyclorama Can Cost You $500?
- How to Step Over Tether Cables Without Disconnecting the Camera?
- Who Controls the Playlist: When Is It Okay to Ask for Your Own Music?
- Freezing in Summer: How to Handle AC During Swimwear Shoots?
- Flash Blindness: How to Blink in Sync With the Strobe Lights?
- Why Leaving Your Coffee Cup on the Cyclorama Is a Mortal Sin?
- The “It’s a Wrap” Protocol: What to Do Before Leaving the Studio?
- The Unwritten Rules of Set Etiquette That Get You Rebooked?
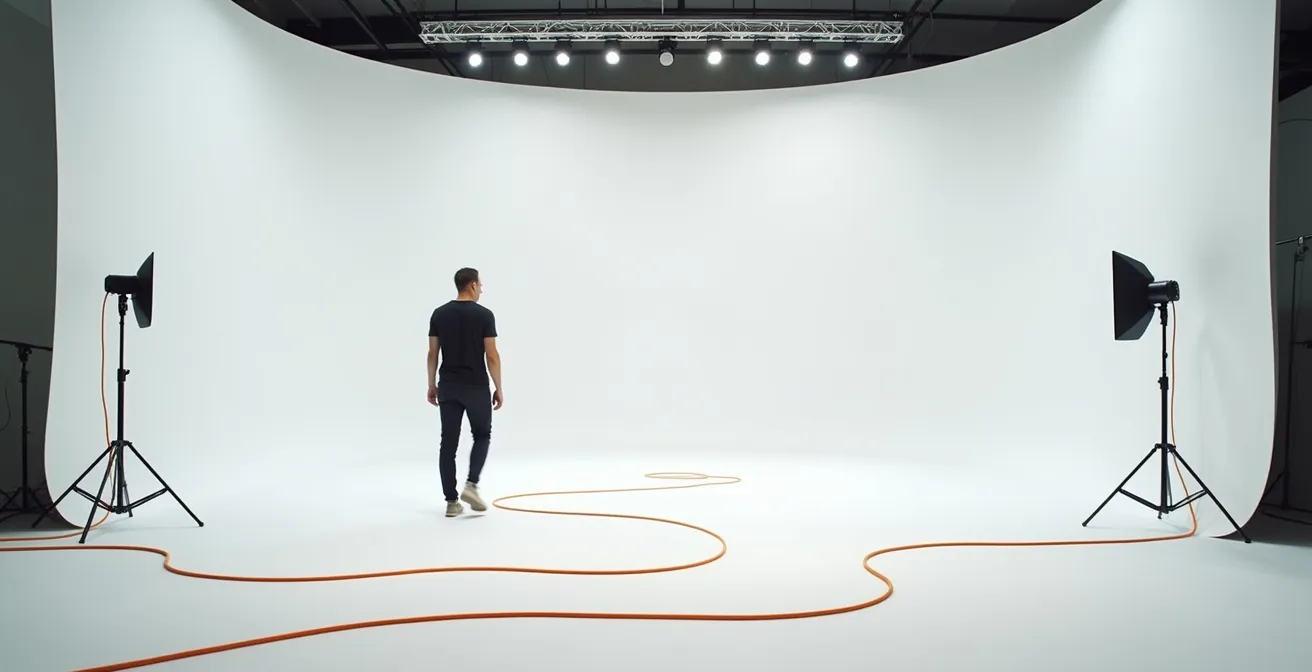
Why Stepping on the Curve of the Cyclorama Can Cost You $500?
The first and most important rule of studio life is this: never step on the curve of the cyclorama. That seamless, magical infinity background looks solid, but it’s the most fragile and expensive part of the studio floor. It’s often made of plaster or a similar material, designed to create a perfect, smooth transition from wall to floor. It is not designed to support your body weight. Placing your foot on that curve, even for a second, can cause it to crack, dent, or scuff. The “infinity” effect is ruined, and the entire section has to be professionally repaired and repainted, a process that easily costs hundreds of dollars.
This isn’t a theoretical problem; it’s a financial one. Many studios explicitly state in their rental agreements that any damage to the cyclorama will be billed directly to the client who booked the space. To cover this risk, many studios require a security deposit of $500 or more, which is forfeited if the cyc is damaged. The photographer who hired you will be held responsible, and that cost will be forever associated with your name. It’s the fastest way to get a reputation as an amateur who is a liability on set.

As the image above illustrates, the surface is a delicate, matte finish. Treat the curve like it’s a red-hot laser beam. Always give it a wide berth. Stay on the flat part of the floor, and if you need to get close, be hyper-aware of where your feet are. The crew uses sandbags, gaffer tape, and extension poles to work around it, and you should adopt that same level of caution. Your spatial awareness starts here.
How to Step Over Tether Cables Without Disconnecting the Camera?
After the cyclorama, the next biggest hazard on set is the web of cables snaking across the floor. The most critical of these is the tether cable, a thick cord (often bright orange or yellow) connecting the photographer’s camera directly to the digital tech’s computer. This is the central nervous system of the shoot. Every photo taken travels down this line to the monitor where the client, art director, and photographer review the images in real-time. Tripping on this cable is a cardinal sin.
At best, you’ll momentarily disconnect the camera, forcing the entire shoot to pause while the digital tech re-establishes the connection. This breaks the creative flow and wastes valuable time. At worst, you can send a multi-thousand-dollar camera and lens crashing to the concrete floor. There is no faster way to end a shoot—and potentially a career—than by destroying the primary piece of equipment. This is why professional crews are obsessive about keeping pathways clear; a clear walkway is a fundamental safety practice to prevent accidents.
Navigating this is not difficult, but it requires conscious effort. Never drag your feet. Adopt what we call the “Cable Shuffle”:
- Always perform a conscious, deliberate high-step over any cables. Assume every cable is a tripwire.
- If you are moving behind someone, especially the photographer who is looking through a lens, announce your presence. A simple, clear “cable behind you” is professional courtesy.
- Pay attention to any brightly colored gaffer tape on the floor. It’s there to mark a cable path and warn you.
- If the crew has set up cable ramps or protectors, use them. They are there for a reason.
This is a core part of on-set spatial awareness. Your job is to be graceful in front of the camera, but your safety and the safety of the gear depend on being deliberate and careful when you’re off your mark.
Who Controls the Playlist: When Is It Okay to Ask for Your Own Music?
Moving from physical safety to the set’s atmosphere, let’s talk about music. The photographer or a client representative usually controls the playlist. The music is chosen to establish a specific mood for the shoot, energize the team, or simply serve as neutral background noise that keeps the vibe positive. It’s part of the creative direction. As a new model, your default position should be to work with whatever is playing. Complaining about the music is seen as unprofessional and self-centered.
However, there are moments when a change in music can genuinely enhance your performance. If you are asked to portray a very specific emotion or character—high energy, somber, or aggressive—and you have a playlist that helps you get into that headspace, you can make a polite and professional request. The key is how you frame it. It should never be about your personal preference (“I don’t like this song”). It must be framed as a tool to help you deliver a better final product for the client.
A diplomatic and effective way to phrase this comes from established industry best practices. As a professional model communication script suggests, you could say something like this:
To help me get into the energetic character for this look, I have a playlist that works wonders. Would you be open to giving it a try for a bit?
– Professional Model Communication Script, Industry best practice for diplomatic music requests
This approach shows that your focus is on the job, not your own comfort. It positions you as a proactive collaborator, not a demanding diva. Be prepared for the photographer to say no. They may have a specific reason for their music choice, or the client may have requested it. If they decline, accept it gracefully and find another way to get into character. Your flexibility will be noted and appreciated far more than your taste in music.
Freezing in Summer: How to Handle AC During Swimwear Shoots?
It’s a strange paradox of studio life: some of the coldest days you’ll experience as a model will be in the middle of summer during a swimwear or lingerie shoot. You’re in minimal clothing, yet the air conditioning is blasting. This isn’t because the crew is inconsiderate; it’s a technical necessity. Studio lights, especially powerful strobes and continuous video lights, generate an incredible amount of heat. Without powerful AC, the studio would quickly become an oven. This is crucial because excessive heat can degrade expensive bulbs and even cause color temperatures to shift, affecting the quality and consistency of the images.
While the crew is comfortable in jeans and t-shirts, you’re shivering. Getting goosebumps is a real problem; they are visible on camera and can ruin an otherwise perfect shot. Complaining won’t get the AC turned off, but you can and should come prepared. A professional model takes responsibility for their own comfort between takes. This means packing a “Temperature Go-Bag” for every shoot, regardless of the season. Your go-bag should include:
- A thick, warm robe or a large fleece blanket.
- Thermal slippers or Ugg-style boots to wear when you’re not on camera.
- Reusable hand warmers you can tuck into your robe pockets.
- A thermos of hot tea or coffee to help you warm up from the inside.
- Leg warmers that are easy to slip on and off between setups.

As soon as the photographer calls a break for a lighting change or review, your first move should be to grab your robe and get warm. Don’t wait until you’re freezing. Being proactive about managing your body temperature shows you understand the technical demands of the environment and are prepared to work within them. It’s a sign of a true professional.
Flash Blindness: How to Blink in Sync With the Strobe Lights?
A common struggle for new models is “flash blindness” and the involuntary urge to blink at the exact moment the strobe fires. A full-power studio strobe is intensely bright, and your natural reflex is to shut your eyes. This leads to a frustrating series of unusable shots with your eyes half-closed or fully shut, wasting time and breaking the rhythm of the shoot. Photographers are patient, but they need usable frames. Mastering the timing of your blinks is a technical skill you must learn.
The solution isn’t to try to force your eyes to stay open, which often results in a strained, deer-in-the-headlights expression. Instead, you need to work *with* the flash, not against it. This involves a simple but effective technique that syncs your blinking with the photographer’s cadence. By resetting your eyes between shots, you can ensure they are fresh, relaxed, and wide open at the moment of capture. It’s a rhythm you learn to feel, but it can be broken down into a series of conscious actions.
This skill turns you from a passive subject into an active participant in the technical process of image capture. It demonstrates that you understand the mechanics of strobe photography and are working with the photographer to create the best possible image. It’s a small detail that makes a huge difference in the efficiency and success of a shoot.
Action plan: The Blink and Reset Technique
- Close your eyes completely between shots. As soon as a shot is taken, let your eyelids close. This gives your pupils a moment to reset and your eyes to relax.
- Listen for the photographer’s cues. They will often have a verbal or physical rhythm—a countdown, a “ready,” or a hand signal. Tune into this cadence.
- Open your eyes just before the flash. The key is timing. Aim to open your eyes wide and fresh about one second before you expect the flash to fire.
- Find a neutral focus point. Between shots, while your eyes are closed or resting, don’t stare at the light. Find a spot on the wall or floor away from the main flash to look at.
- Shift your gaze at the last second. Only lock your eyes on the camera lens at the very last moment before the capture. This keeps your expression fresh.
Why Leaving Your Coffee Cup on the Cyclorama Is a Mortal Sin?
We’ve established you should never step on the cyclorama curve, but that rule extends to everything else. The cyc wall is not a table, a shelf, or a convenient place to put down your water bottle or coffee cup. This is a “mortal sin” on set for two critical reasons: the risk of damage and the cost of cleaning.
First, spills. A single drop of coffee, soda, or any colored liquid on a pristine white cyc creates a stain that is impossible to remove without repainting the entire floor. This triggers the same costly repair process as a physical crack, instantly making the production liable for hundreds of dollars in damage fees. Even a clear liquid like water can leave a watermark or attract dust, creating a visible imperfection that will show up in photos and require extensive, expensive retouching to fix. The floor needs to be perfectly, uniformly white.
Second, condensation from a cold drink can leave a ring of moisture. This moisture can weaken the plaster surface or, at the very least, create a spot where dust and dirt will stick, creating a blemish. To avoid these issues, professional studios have strict rules about where food and drinks are allowed. Your responsibility is to know these zones and respect them implicitly. The studio is a professional workspace, and maintaining its set integrity is paramount.
This table outlines the standard safe and prohibited zones in most studios. Your default assumption should be that if an area is not explicitly designated for food and drink, it is a “no-go” zone. As a general rule, your coffee cup should never come anywhere near the shooting area.
| Safe Zones for Food & Drinks | Strictly Prohibited Areas |
|---|---|
| Makeup station/vanity area | Cyclorama wall and curve |
| Client lounge/viewing area | Near any electrical equipment |
| Kitchen/break room | On or near lighting stands |
| Designated craft services table | Camera and tethering stations |
| Outside the studio space | Props and wardrobe areas |
The “It’s a Wrap” Protocol: What to Do Before Leaving the Studio?
When the photographer calls out, “That’s a wrap!” it’s a moment of relief and accomplishment for everyone. But for a professional model, the job isn’t quite over. How you conduct yourself in the final 15 minutes of your time on set can solidify the positive impression you’ve made all day, making you more likely to be rebooked. Don’t just grab your bag and run. Follow a clear “wrap protocol.”
First, take care of your own space. Do a full, 360-degree sweep of your station at the makeup vanity and in the changing room. Look for forgotten phone chargers, water bottles, jewelry, or personal clothing items. Leaving things behind creates work for the studio manager and makes you seem disorganized. Once your area is clear, the next step is to professionally close out with the team. This involves both logistical questions and simple professional courtesy.
Your wrap checklist should look something like this:
- Check your space: Do a final sweep for all personal items.
- Ask about social media: Inquire about the policy on sharing any behind-the-scenes photos you may have taken. Never post without permission.
- Clarify next steps: Politely ask about the expected timeline for receiving proofs or final images.
- Confirm contact info: Ensure the producer or photographer has your correct contact information for payment and future bookings.
- Thank the crew: Make a point to thank the photographer, makeup artist, stylist, and any assistants individually. A genuine thank you goes a long way.
Finally, the most professional gesture you can make is to offer help. It shows you see yourself as part of the team, not just the talent who is there to be served. A simple question can leave a powerful, lasting impression:
Is there anything I can help with before I head out?
– Professional Studio Etiquette Guide
They will almost always say no, but the offer itself speaks volumes about your work ethic and team-player attitude. It’s the final step in cementing your reputation as a true professional.
Key Takeaways
- The cyclorama curve is extremely fragile; stepping on it or placing items on it can lead to costly repairs and damage your professional reputation.
- Spatial awareness is a critical skill. Always be conscious of cables, light stands, and the “working triangle” to prevent accidents and disruptions.
- Come prepared for the environment. Bring a “go-bag” with warm clothing for cold studios and practice techniques to manage blinking with strobes.
The Unwritten Rules of Set Etiquette That Get You Rebooked?
By now, you understand the big, costly mistakes to avoid. But getting rebooked isn’t just about not causing problems; it’s about being a positive asset to the production. The models who work constantly are the ones who have mastered the subtle, unwritten rules of set etiquette. They have adopted a grip’s mindset: they are problem-solvers who make the photographer’s job easier, not harder. This means being proactive, self-sufficient, and spatially aware at all times.
The most crucial unwritten rule is to respect the “working triangle.” This is the invisible, sacred space between the photographer’s lens, the model (you), and the main light source. Never walk through this triangle. Don’t let friends or family who might be visiting the set stand in this area. Crossing this path blocks the light, breaks the photographer’s line of sight, and forces a reset. Always walk around the set, never through the middle of the action.
Beyond that, the goal is to be low-maintenance and high-value. This means anticipating needs and solving small problems before they interrupt the flow of the shoot. It’s a collection of small habits that, together, create an aura of pure professionalism. Here are some of the key unwritten rules that will get you noticed for the right reasons:
- Be ready early: When you are called to set, be there one minute before you’re needed, ready to go.
- Be self-sufficient: Bring your own water and snacks so you don’t have to disrupt craft services. Fix your own stray hair or smudged makeup if you see it in a mirror before the photographer has to pause the shoot to point it out.
- Be silent on set: Wear shoes that don’t squeak. Put your phone on “Do Not Disturb” mode, as even the vibration can be picked up by sensitive audio equipment during video shoots.
- Respect the digital tech’s space: Never hover over the tethering monitor to look at your pictures unless you are explicitly invited by the photographer or art director. It’s a workspace, not a viewing gallery.
- Offer feedback only when asked: Avoid giving your opinion on the images (“I don’t like that one”) unless your feedback is requested. Trust the creative team.
Master these rules, and you’ll transform from a potential liability into an indispensable asset. You’ll not only be safe—you’ll be the professional everyone on the crew respects and wants to work with again.