If your poses feel flat or static, the problem isn’t your body—it’s your perception of the space around it. The secret to dynamic fashion photography lies not in just striking a pose, but in actively sculpting the “negative space” or void surrounding you. By treating your limbs as geometric tools to create compelling shapes like triangles, you transform a simple stance into a piece of art, adding depth, interest, and a professional edge to every shot.
The camera clicks, but the image that appears on the screen feels… lifeless. It’s a common frustration for many models: despite your best efforts, the pose looks blocky, static, or two-dimensional. You’ve followed the standard advice—”bend your knees,” “put a hand on your hip”—but the result still lacks that captivating, artistic quality seen in high-fashion editorials. The energy just isn’t there.
The issue often stems from focusing solely on the body as an object, rather than seeing it as one half of a visual dialogue. But what if the key wasn’t just the shape you make, but the shape of the space you *don’t* occupy? The secret lies in mastering negative space. This is where posing transcends simple posture and becomes an act of sculpture. You are not just presenting a garment; you are carving the air around you, creating a composition that guides the viewer’s eye and tells a story.
This guide moves beyond generic tips to explore the geometric principles of elite posing. We will deconstruct how to use your body as an artistic instrument to create triangles, how the placement of your feet becomes the foundation for your entire spinal architecture, and how to inject kinetic energy into every last fingertip. It’s time to stop just posing and start sculpting.
For a dose of real-world inspiration, the following video offers a look at capturing the natural poses and interactions of people. Observing how forms exist in their environment is a crucial skill for any model looking to bring authenticity to their work.
To help you master this art form, this article is structured to build your skills from the ground up. Each section focuses on a critical element of geometric posing, providing you with the theory and practical steps to transform your presence in front of the lens.
Contents: The Art of Sculpting with Your Body
- How to Create Triangles With Your Limbs for Stronger Composition?
- Why Your Feet Placement Dictates the Curve of Your Spine?
- “Dead Hands”: How to inject Energy into Your Fingertips?
- Relaxed vs. Collapsed: How to Keep Muscle Tension Without Looking Stiff?
- The “Turtle” Technique: How to Define Your Jawline for the Camera?
- How to Change Poses Every Click Without Losing Your Balance?
- Chin Down or Chin Up: How to Find Your Light Instantly?
- How to Ensure You Get the Hero Shot Before the Light Fades?
How to Create Triangles With Your Limbs for Stronger Composition?
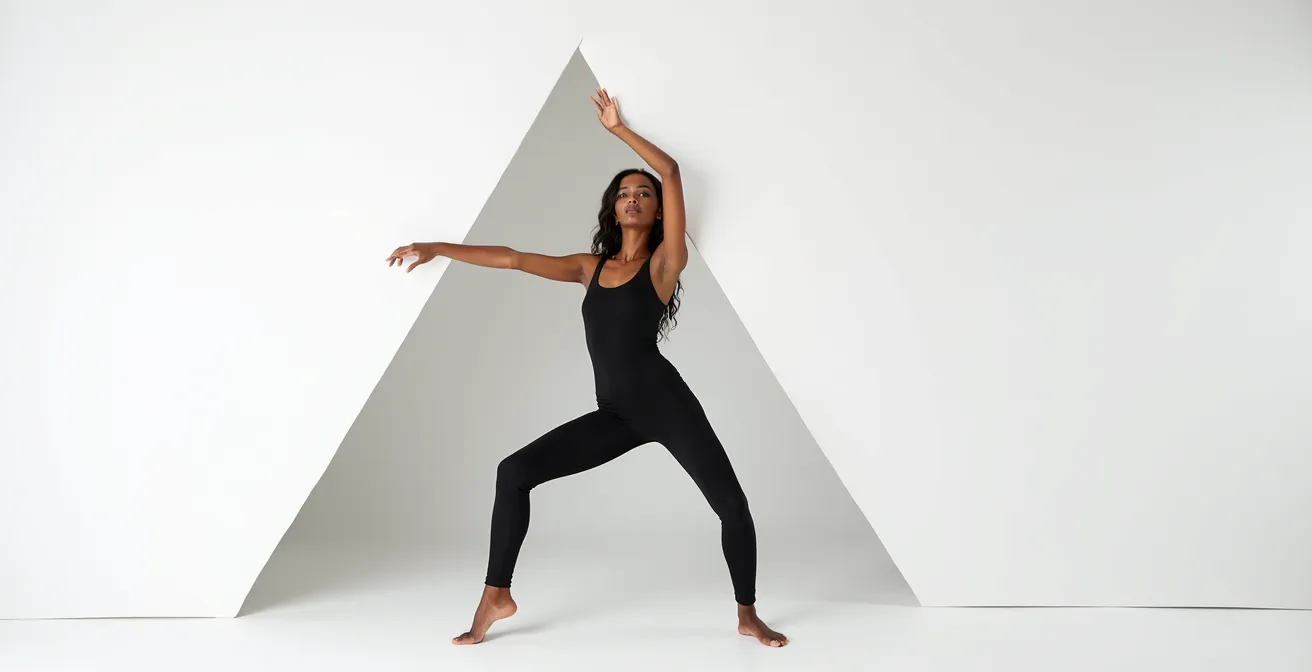
In the language of visual arts, the triangle is the most powerful shape. It conveys strength, stability, and dynamism all at once. For a model, creating triangles with the body is the fastest way to break up a “blocky” silhouette and introduce professional-level composition. This isn’t just about bending an elbow; it’s about a conscious geometric dialogue between your body and the space around it. When you place a hand on your hip, you’re not just resting it—you’re creating a triangular pocket of negative space between your arm and torso.
This principle is the bedrock of high-fashion posing. The negative space you create is just as important as your physical form. These gaps guide the viewer’s eye, create visual interest, and can be used to frame the garment you’re wearing. A simple V-shape made with the arms overhead, a crossed leg creating a gap, or a bent knee in a seated pose all transform a static image into a dynamic one. High-end fashion photography consistently relies on these geometric principles to add sophistication and structure to their imagery.
To start incorporating this into your practice, think about these fundamental triangular shapes:
- The Arm-Hip Triangle: Place one hand on your hip with the elbow pointed outward. This is the most classic and effective starting point.
- The Raised Knee Triangle: In a seated or standing pose, bringing one knee up towards your chest creates a strong triangle between your thigh, calf, and torso.
- The Overhead Frame: Raise your arms above your head and connect your fingertips or cross your wrists to frame your face with an inverted triangle.
- The Leaning Leg Triangle: When leaning against a wall, crossing one leg over the other creates powerful negative space between your legs.
These shapes are your foundational vocabulary. Practice them until they feel natural, and then begin combining them to create more complex and compelling compositions. The goal is for these geometric forms to become an intuitive part of your posing toolkit.
Why Your Feet Placement Dictates the Curve of Your Spine?
A pose doesn’t start with the shoulders or the hips; it starts from the ground up. Your feet are the anchor of your entire posture, and their placement directly influences the shape of your body, especially the curve of your spine. A flat, static pose often begins with feet that are planted squarely and symmetrically. To create a dynamic and graceful line, you must first master your spinal architecture, and that begins with your stance.
The classic technique for this is known as contrapposto, an Italian term for “counter-pose.” It involves shifting your weight onto one leg (the “standing leg”) while the other leg is relaxed and bent. This simple weight shift causes a cascade of natural, asymmetric adjustments up through the body: your hips will tilt, your shoulders will counter-balance by tilting the opposite way, and your spine will form a gentle “S” curve. This is the secret to looking relaxed yet poised, and it completely eliminates a stiff, soldier-like posture.
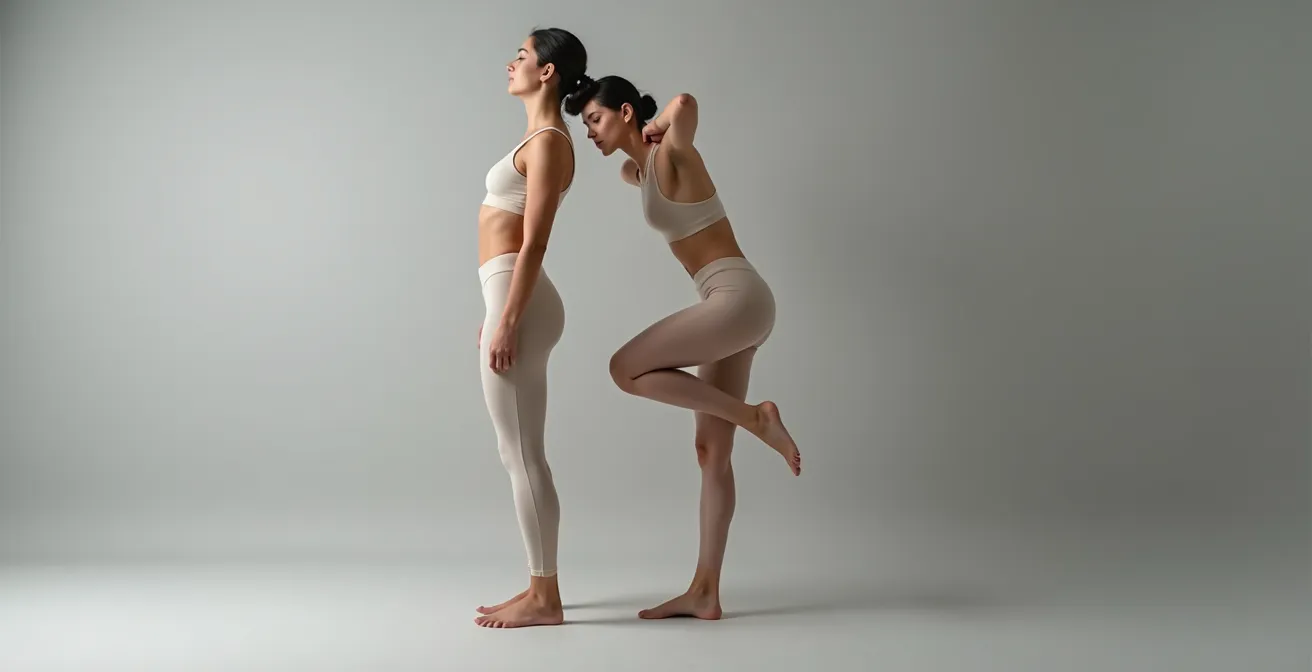
As you can see in the image, a subtle change in foot position and weight distribution transforms a straight line into an elegant curve. Think of your body as a kinetic chain. A change at the base (your feet) will inevitably travel upwards. For fashion photography, this is critical because the S-curve not only looks more artistic but also showcases how fabric drapes and moves on a three-dimensional form. It brings the clothes to life.
To practice, stand in front of a mirror. Place your feet shoulder-width apart, and then shift all your weight to your right leg. Allow your left knee to bend naturally. Watch how your left hip drops and your right shoulder lifts slightly. This is the foundation. From here, you can experiment by placing the relaxed foot forward, back, or crossed over, each creating a slightly different line.
“Dead Hands”: How to inject Energy into Your Fingertips?
A powerful full-body pose can be instantly ruined by “dead hands”—hands that hang limply, are awkwardly clenched, or look like an afterthought. Your hands are incredibly expressive, and failing to pose them with intention is a missed opportunity. The key is to project kinetic energy all the way to your fingertips, making them look engaged and graceful, not stiff or forgotten. This small detail separates amateur models from professionals.
The common mistake is to either completely ignore the hands or to over-think them, resulting in tense claws or perfectly flat, unnatural palms. As one expert notes, the goal is a natural, elegant position. In a guide for photographers, a fashion expert advises on this very point:
Avoid clenched fists – they convey anger and tension. Instead, ask models to bend their fingers slightly for a natural, open position.
– Fashion Photography Expert, Skylum Blog Fashion Posing Guide
To achieve this, you need to find a balance between relaxation and engagement. The energy should look like it’s flowing through your arms and out of your fingers. Instead of thinking about “posing” your hands, think about giving them a purpose or an imaginary task. This mental shift is often all it takes to bring them to life.
Here are several visualization techniques to energize your hands naturally:
- Hold a butterfly: Imagine you are holding a delicate butterfly in your palm. Your fingers would curve gently to protect it, with just enough tension to keep it safe.
- Brush against silk: Pretend your fingertips are lightly brushing against a piece of silk fabric. This encourages a flowing, graceful movement and natural separation.
- Activate subtle muscles: Lightly pressing your tongue to the roof of your mouth can create a subtle, systemic muscle activation that extends to your hands.
- Create separation: Avoid pressing your fingers tightly together. A slight, natural separation between each finger looks more relaxed and elegant.
- Rotate the wrist: Never press your hand flat against your body. A slight rotation of the wrist will reveal the hand’s shape and prevent it from looking two-dimensional.
Relaxed vs. Collapsed: How to Keep Muscle Tension Without Looking Stiff?
There is a fine line between a body that is relaxed and one that is collapsed. A collapsed posture lacks energy and reads as sloppy on camera, while a stiff, overly-tensed body looks rigid and unnatural. The sweet spot is a state of active lengthening—a pose that is energized from within, maintaining muscle engagement without visible strain. This is a skill that professional dancers and actors spend years perfecting, as it allows for both powerful presence and fluid movement.
Think of it as the difference between a cooked noodle and a stretched elastic band. One is limp and formless; the other is full of potential energy. To achieve this, you must project energy outwards from your core through your limbs. Imagine a string pulling the crown of your head towards the ceiling, elongating your spine. At the same time, imagine your fingertips and toes reaching away from your body. This creates an internal opposition that generates graceful tension.
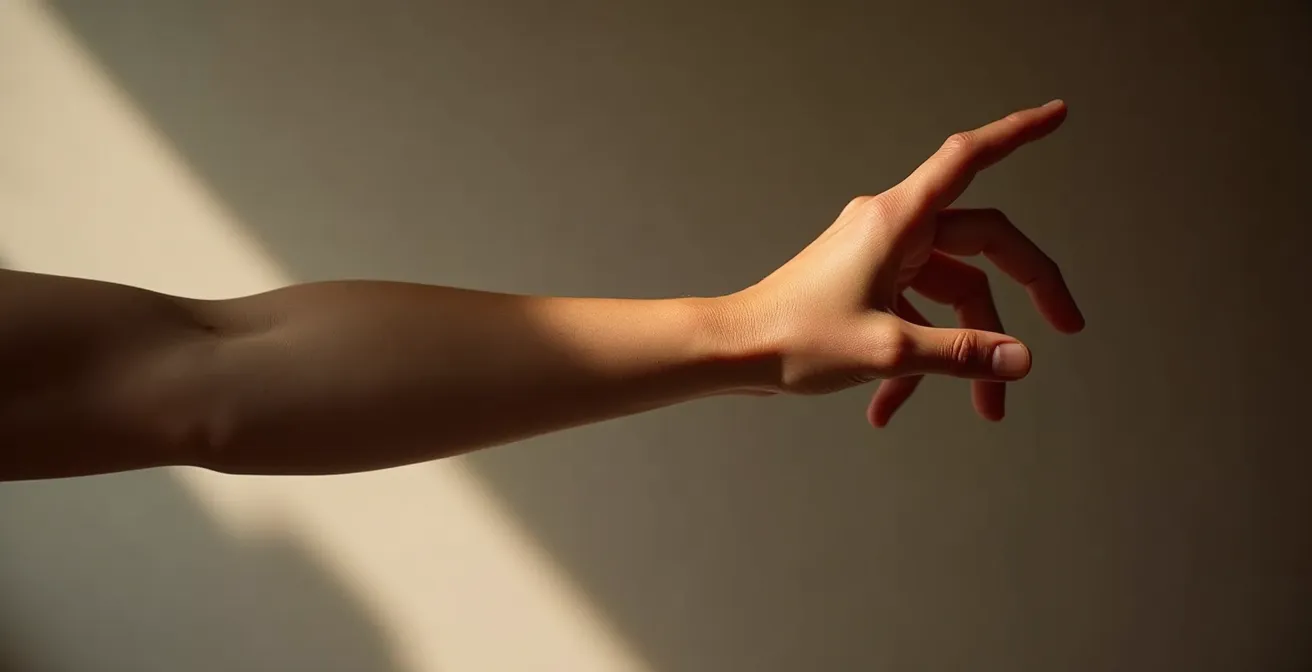
This macro shot perfectly illustrates the concept. The arm is extended, but it’s not locked stiffly at the elbow. You can see the subtle muscle definition that indicates engagement, an energy that flows all the way to the fingertips. The hand is not limp; it has purpose and form. This is the visual signature of a professional who has mastered their physical instrument. This control allows models to produce bold movements and intense expressions, then flawlessly change poses on command.
To cultivate this feeling, start with your core. A gently engaged core is the powerhouse for all your movements. From there, focus on one limb at a time. Extend your arm not by locking your elbow, but by imagining you are reaching to touch something just beyond your grasp. Feel the energy extend through your entire arm. Do the same with your legs. This active lengthening will make your poses look both stronger and more elegant, solving the “flat and blocky” problem at its source.
The “Turtle” Technique: How to Define Your Jawline for the Camera?
Even the most chiseled jawline can disappear on camera if the head is held at the wrong angle. When the chin is tucked too close to the neck, it can create the appearance of a double chin and soften the face’s natural contours. The common advice to “jut your chin out” often leads to an unnatural, aggressive posture. The solution, popularized by headshot photographer Peter Hurley, is a counter-intuitive move known as the “Turtle” technique.
The goal is to create separation between your jaw and your neck, which accentuates the jawline and gives it a sharp, defined look. Instead of simply lifting your chin up, the technique involves pushing your forehead *forward*, towards the camera, and then slightly down. Imagine a turtle slowly extending its head out of its shell—it’s a forward motion, not an upward one. This elongates the neck and tightens the skin under the chin, creating a clean, powerful line. This technique is so effective that some professional photography tutorials demonstrate that 100% of cases show a cleaner jaw-to-neck separation with simple neck elongation methods.
While it may feel awkward at first, the result on camera is dramatic and looks completely natural. It’s a subtle adjustment that makes a massive difference in portraits and beauty shots. Here is how to execute the technique step-by-step:
- Establish Good Posture: Start by sitting or standing tall with your shoulders back and relaxed. This is your baseline.
- Push Your Forehead Forward: Instead of leading with your chin, imagine an invisible string pulling your forehead directly towards the camera lens. Your whole head and neck should move forward.
- Think “Ears Forward”: Another mental cue is to try to bring your ears forward. This helps achieve the “turtling” motion without lifting your chin.
- Elongate Your Neck: As you hold this forward position, maintain the feeling of length in your neck, as if being pulled up by a string from the crown of your head.
- Add a Slight Chin-Down Angle: To complete the look, slightly tilt your chin down. This combination of forward extension and a slight downward angle creates the optimal jawline definition.
This technique is a game-changer. Practice it in the mirror to see just how much definition it adds. Once you master the feeling, it will become a go-to move in your posing arsenal.
How to Change Poses Every Click Without Losing Your Balance?
“Give me something different every shot!” is a common directive from photographers. The pressure to produce a variety of poses rapidly can lead to flailing, loss of balance, and a series of disconnected, weak shapes. The key to dynamic, fluid posing is not wild, chaotic movement, but controlled transitions anchored from a stable core. You need a system that allows for maximum variety with minimum effort and repositioning.
Instead of thinking of each pose as a separate entity, think of them as points on a clock face. Your standing position is the center, and by shifting your weight, turning your hips, and moving your arms, you can flow from one “hour” to the next without ever losing your foundation. This requires a strong core anchor and an understanding of micro-movements. A small shift in hip angle, the turn of a wrist, or a change in gaze can create an entirely new shot without requiring a full-body reset.
Different situations call for different stability strategies. A full-body shot in a wide frame requires a different approach than a tight beauty shot where only subtle shifts are visible. As this comparative analysis of stability techniques shows, a model’s toolkit should include multiple methods for maintaining balance while enabling movement.
| Technique | Stability Level | Movement Range | Best For |
|---|---|---|---|
| Posing Clock System | High | 360° rotation | Full body shots |
| Core Anchor Method | Very High | Limited torso | Upper body focus |
| Micro-Movements | Maximum | Subtle shifts | Rapid shooting |
| Weight Shifting | Medium | Hip to hip | Dynamic poses |
To put this into practice, start with a solid contrapposto stance. This is your “home base.” From there, explore your range of motion. Move one arm, then the other. Turn your head. Shift your gaze. Then, flow into a slightly different leg position. By breaking down the movement into these small, controlled parts, you can create an endless stream of unique poses that all look connected and intentional, all while staying perfectly balanced.
Chin Down or Chin Up: How to Find Your Light Instantly?
The angle of your chin does more than just define your jawline; it tells a story and fundamentally changes how light shapes your face. There is no single “correct” chin position. The right choice depends entirely on the mood you want to convey and the location of the light source. Learning to “find your light” by making micro-adjustments with your chin is a crucial skill that gives you, the model, a powerful degree of control over the final image.
A chin-up pose can communicate confidence, defiance, pride, or a sense of reaching for something. It exposes the neck and lifts the face towards the light, often creating a bright, open expression. Conversely, a chin-down pose can suggest introspection, coyness, vulnerability, or even sadness. It creates shadows under the brows, accentuates the eyes, and can feel more intimate or mysterious. As one expert puts it, the choice is narrative.
Chin up can convey confidence, defiance, or reaching; chin down can convey introspection, coyness, or sadness. The ‘right’ light depends on the desired story.
– Fashion Photography Expert, Professional Photography Guide
Beyond storytelling, chin angle is a technical tool for controlling catchlights—the reflection of the light source in your eyes. Catchlights are what make eyes look alive and vibrant. By adjusting your chin, you can position these highlights perfectly. A great method for this is the “Catchlight Compass” technique, which involves using your own eyes as a guide to find the most flattering light.
Here’s how you can use this technique on set:
- Locate the source: First, identify where the main light is coming from. You should see its reflection in the photographer’s lens or in a mirror.
- Find the reflection in your eyes: Look for that small white dot of light in your own eyes. Ideally, you want this catchlight to be positioned in the upper portion of your iris (between 10 o’clock and 2 o’clock).
- Tilt up if it’s too low: If the catchlight is in the bottom half of your eye, it can make you look tired or menacing. Tilt your chin up slightly until the reflection rises.
- Lower down if it’s too high: If the catchlight is above your iris or not visible, you’ve tilted too far. Lower your chin gradually until it settles in the ideal position.
- Maintain connection: Always aim to have a visible catchlight in at least one eye to ensure you look connected and engaged with the viewer.
Key Takeaways
- Your primary role is not just to pose, but to actively sculpt the negative space around your body into compelling geometric shapes.
- Triangles are your most powerful tool. Use your limbs to create them and instantly add dynamic structure to any pose.
- True elegance comes from “active lengthening”—maintaining subtle muscle tension from your core to your fingertips to avoid a collapsed posture.
How to Ensure You Get the Hero Shot Before the Light Fades?
The “golden hour” is fleeting, and the pressure on set can be immense. When the light is perfect, there’s no time for hesitation. Ensuring you get that one iconic “hero shot” before the opportunity vanishes requires more than just good posing; it requires a strategy. It’s about being prepared, efficient, and able to deliver your most powerful compositions precisely when it matters most. After all, the entire shoot often hinges on capturing a few key visuals.
Consistency and planning are what separate professional campaigns from amateur shoots. In a competitive market, brands cannot leave their hero shots to chance. In fact, comprehensive industry analysis shows a clear pattern: studies found that 88.1% of fashion brands maintain consistency in their product photography, following the same angles, shots, and rehearsed poses to guarantee a high-quality, cohesive result. As a model, being part of this efficient execution is your job.
This means you need a pre-shoot plan. The Geometric Shot List is a strategy that involves preparing a small set of your strongest poses in advance, focusing on powerful geometric concepts. You rehearse these shapes and the transitions between them, so when the light is perfect, you can move through them with confidence and precision. This preparedness allows the photographer to focus on capturing the moment, knowing you can deliver the core compositions.
Your Pre-Shoot Geometric Audit
- Points of contact: Before the shoot, identify 3-5 key geometric shapes you want to create (e.g., a strong arm/hip triangle, a specific S-curve, a closed circular shape with your body). These are your core poses.
- Collecte: Review your mood board and the garment’s design. Inventory existing poses from your arsenal that would complement the story and the clothing’s structure.
- Cohérence: Confront your planned poses with the brand’s values and the shoot’s narrative. Does a powerful, angular pose fit a soft, romantic theme? Adjust accordingly.
- Mémorabilité/émotion: Among your planned poses, designate one as your “Apex Pose”—the most unique and powerful shape you can create. This is the shot you save for the absolute best light.
- Plan d’intégration: Rehearse the transitions between your core poses. Practice flowing from one shape to the next smoothly, so you don’t have to reset your balance and can offer variety quickly.
By arriving on set with this mental shot list, you transform from a passive subject into an active collaborator. You are no longer just hoping to get a good shot; you are executing a plan to create one. This level of professionalism and preparation is what ensures you get the hero shot, every single time.
Now, step in front of the camera not just as a model, but as a sculptor. Take these geometric principles and begin crafting your own visual narrative, transforming every click into a work of art.