The secret to professional-grade iPhone photos isn’t expensive gear; it’s mastering the technical craft of a photographer to create intentional, editorial-style images.
- Prioritize the quality and direction of soft, natural light over artificial sources like ring lights.
- Adopt a professional editing workflow, using VSCO for mood and Lightroom for precise color grading and refinement.
- Treat your background as a compositional element, using textures and props to build a narrative.
Recommendation: Begin by auditing your Instagram profile, treating it as a dynamic composite card to attract the right clients and agencies.
For aspiring models, the pressure to produce a constant stream of high-quality portfolio content is immense. The conventional path involves expensive photographers, studios, and stylists—a significant barrier when you’re just starting out. Many believe that professional-looking photos are simply out of reach without a DSLR camera and a full crew. You might be relying on simple phone features like “Portrait Mode” and hoping for the best, often feeling that the results lack the polished, editorial quality that agencies and clients look for.
But what if the device already in your pocket holds the key to creating compelling, agency-ready images? The challenge isn’t the hardware; it’s the technique. This guide moves beyond generic advice like “find good light.” Instead, we will deconstruct the specific, deliberate choices professional photographers make regarding light, editing, and composition. The true secret is learning to replicate that technical craft—to stop taking snapshots and start constructing images with intention.
This article will provide a technical roadmap to transform your iPhone into a powerful tool for portfolio development. We’ll cover everything from mastering window light and advanced editing workflows to styling on a shoestring budget and curating your social media as a professional calling card. By the end, you will have the knowledge to independently produce content that looks and feels genuinely editorial.
text
To guide you through this process, we’ve broken down the essential skills and strategies into a clear, step-by-step framework. Explore the topics below to master each aspect of at-home iPhone photography.
Summary: iPhone Photography: How to Shoot Editorial Quality Content at Home?
- Natural Light vs. Ring Light: Why Window Light Always Wins?
- VSCO vs. Lightroom: Which App Presets Look Most Professional?
- The Self-Timer Trick: How to Focus on Yourself Without an Assistant?
- Behind the Scenes: How to Film Yourself on Set Without Being Distracting?
- The “Messy Room” Mistake: Why Your Background Is as Important as Your Face?
- Why Professional Photos Are a Waste of Money for Your First Agency Submission?
- Thrifting and Returns: How to Style a High-Fashion Shoot for Under $50?
- Instagram as a Composite Card: How to Audit Your Profile for Clients?
Natural Light vs. Ring Light: Why Window Light Always Wins?
The single most significant difference between amateur and editorial photography is the quality of light. While ring lights are popular for their convenience, they produce flat, shadowless light that eliminates facial dimension and often creates distracting circular catchlights in the eyes. Editorial photography, in contrast, thrives on soft, directional light that sculpts features and creates a mood. This is where a simple window becomes your most powerful tool. Window light is naturally diffused, especially on an overcast day or when indirect, wrapping around your subject to create a gentle gradient from highlight to shadow.
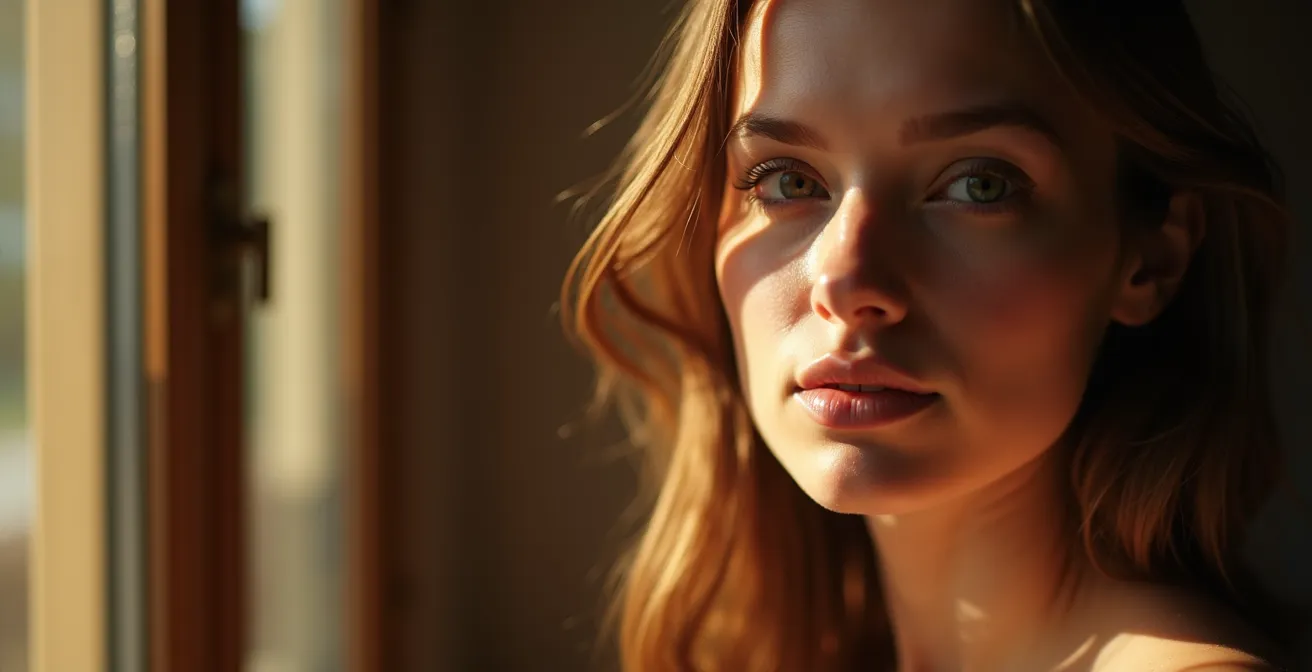
The key is control. The distance from the window dictates the softness of the light; professional lighting research shows that positioning subjects closer to windows creates softer lighting with improved skin tone rendering. To take this further, you can modify the light. For a high-contrast, chiaroscuro effect, place a piece of black cardboard opposite the window (this is called negative fill) to absorb light and deepen shadows. Conversely, to soften shadows, use a white towel or foam board to bounce light back onto your face. You can even tape parchment paper over the window to transform harsh, direct sunlight into a giant, soft light source.
This hands-on approach to “shaping” light is fundamental to the craft. It demonstrates an understanding of lighting principles that goes far beyond simply turning on a ring light, and it’s a skill that will immediately elevate the quality of your images. By learning to see and manipulate natural light, you’re not just taking a photo; you’re intentionally creating a specific look and feel.
VSCO vs. Lightroom: Which App Presets Look Most Professional?
Post-production is not about applying a generic filter; it’s about refining the image to achieve a specific, consistent aesthetic. For an editorial look, the goal is often to emulate the subtle color palettes and textures of film. While many apps offer one-click solutions, a professional workflow separates the process into two distinct stages: mood-setting and technical refinement. This is where combining VSCO and Adobe Lightroom Mobile becomes a powerful strategy. VSCO excels at film emulation, offering a library of presets designed to replicate the look of classic film stocks like Kodak Portra or Fujifilm Pro.
Film Stock Emulation Recipe for an Editorial Look
Professional photographers recommend a two-app workflow: Start with VSCO to establish mood using film-inspired presets like A6 (analog) or HB1 (black and white), then export to Lightroom Mobile for technical refinements. As confirmed in a guide on emulating film stock for an editorial look, key adjustments include adding grain (15-25%), reducing clarity (-10 to -20), warming highlights (+5 temperature), and cooling shadows (-5 temperature) to replicate the Kodak Portra 400 aesthetic commonly used in editorial fashion photography.
However, relying on VSCO alone is limiting. Its controls are basic. This is where Lightroom Mobile comes in. After applying a base preset in VSCO, you should export the image to Lightroom for precision work. Lightroom offers professional-grade tools like advanced HSL (Hue, Saturation, Luminance) panels for targeted color adjustments, full tone curve control for precise contrast, and superior noise reduction for cleaning up images shot in lower light. This dual-app approach mirrors how professional photographers work: establishing a creative direction first, then executing the technical details flawlessly.
The following table breaks down why this combined approach is superior to using just one app for creating a truly professional look.
| Feature | VSCO | Lightroom Mobile | Best For |
|---|---|---|---|
| Film Emulation | Built-in analog presets | Manual recreation needed | Quick mood setting |
| Color Grading | Basic adjustments | Advanced HSL panels | Professional color work |
| Tone Curves | Limited | Full control | Precise contrast |
| Noise Reduction | Basic | Professional-grade | Low-light cleanup |
| RAW Support | Limited | Full DNG support | Maximum editing flexibility |
The Self-Timer Trick: How to Focus on Yourself Without an Assistant?
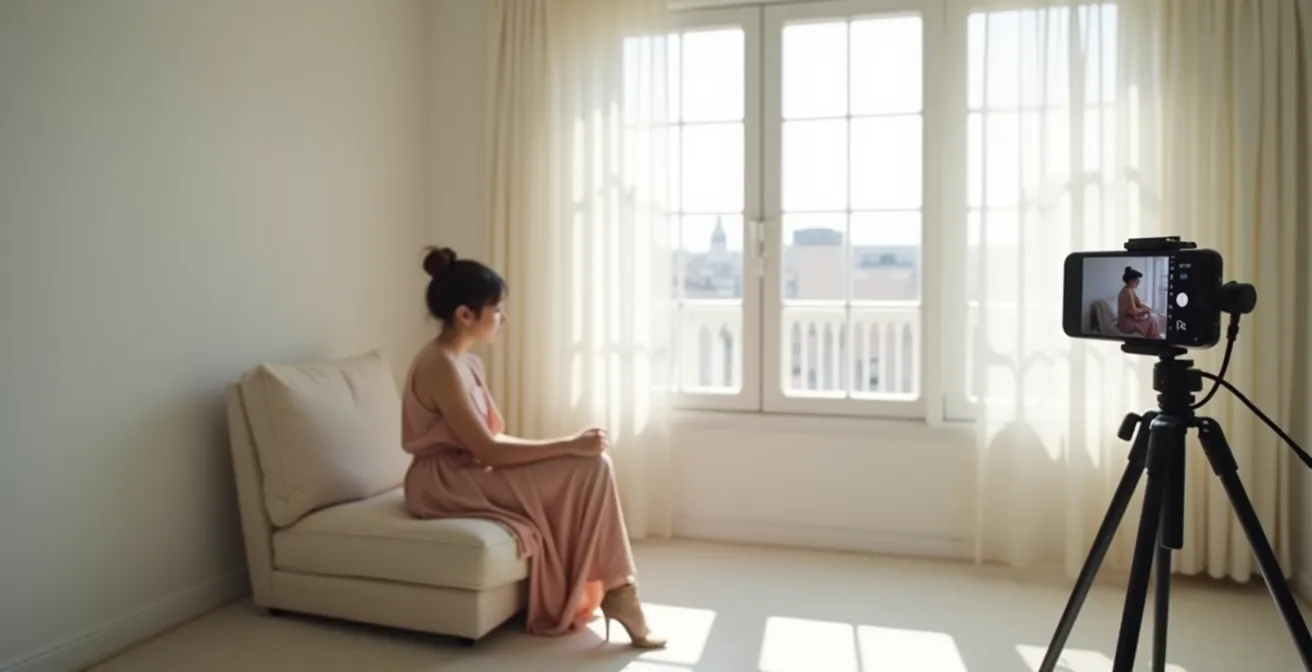
One of the biggest technical hurdles in self-portraiture is achieving sharp focus exactly where you want it. Simply hitting the shutter and running into place often results in the camera focusing on the background, leaving you soft and unusable. The solution lies in taking manual control of your iPhone’s focus and exposure systems. The most crucial technique is the AE/AF Lock (Auto Exposure/Auto Focus Lock). Before you get into position, place a stand-in object (like a light stand, a pillow on a chair, or even a houseplant) exactly where you will be. Then, tap and hold on the screen over that object until the “AE/AF LOCK” banner appears. This tells the camera to lock both the focus distance and the brightness level, preventing it from changing as you move into the frame.
As photographer Aundre Larrow explains in a feature for Artsy on iPhone photography techniques:
The key to self-portraits is locking the exposure on your iPhone camera to maintain better control. Press and hold the part of the screen where you’d like the focus, a small square will pop up with a lock icon, then scroll to adjust exposure.
– Aundre Larrow, Artsy Editorial on iPhone Photography
Once focus is locked, you have several options for triggering the shutter. The built-in 10-second timer is a start, but for more dynamic shots, consider an intervalometer app like Camera+ 2. This allows you to set the camera to take a photo every 1-3 seconds automatically, freeing you to move naturally and capture candid moments without constantly returning to the phone. For the ultimate control, using an Apple Watch as a remote viewfinder and shutter is a game-changer. It allows you to see your composition in real-time and trigger the shot at the perfect moment. To ensure consistency, you can even place small tape markers on the floor to mark your “focus zone,” so you always know where the sharpest point in the frame is.
Behind the Scenes: How to Film Yourself on Set Without Being Distracting?
Creating behind-the-scenes (BTS) content is a powerful way to showcase your professionalism, creativity, and work ethic to potential clients and agencies. However, the process of filming yourself can be distracting and pull you out of the creative zone. The key is to adopt a “fly on the wall” documentary approach that requires minimal active management during your shoot. A professional workflow often involves a dual-phone setup. One iPhone, acting as the “A-camera,” is placed on a tripod to capture a wide, static shot of your entire setup. This footage can run for the duration of your shoot and later be sped up into a hyperlapse to show the overall process.
The second phone, or “B-camera,” is used for capturing micro-storytelling details. Between poses or lighting adjustments, you can quickly pick it up to film close-ups of fabric textures, the way light hits a prop, or your hands making adjustments. This footage adds visual richness and a tactile quality to the final video. Crucially, all video should be shot silent. The goal is to focus on your main task—the photoshoot. You can record a professional voiceover later using the Voice Memos app with a simple lavalier microphone, explaining your process with clarity and intention. This method creates a polished, documentary-style piece that looks far more professional than a simple vlog.
To structure your BTS content, think in terms of a shot list focused on narrative details:
- Extreme Close-Ups: Capture details like jewelry placement, fabric draping, or makeup application.
- Ambient Elements: Film things like steam from a coffee cup, dust particles in light beams, or shadows moving across the walls to build atmosphere.
- The Transformation: Shoot the same angle at different stages of preparation to document the evolution of the set or look.
- The Editing Process: Use your phone’s screen recording feature to show your editing adjustments in Lightroom, then speed it up 10x in post-production.
The “Messy Room” Mistake: Why Your Background Is as Important as Your Face?
A common mistake in at-home photography is treating the background as an afterthought. A cluttered room, distracting furniture, or a plain, boring wall can instantly undermine the quality of a photo, no matter how good the lighting or pose. In editorial photography, the background is never neutral; it is an active compositional element that contributes to the story, mood, and overall aesthetic. Your goal should be to sculpt the background with the same intention you apply to your styling and posing. Instead of showing your entire room, focus on creating abstract textures and layers.

This doesn’t require a professional studio. You can create compelling backgrounds with simple materials. Hanging different fabrics like velvet, silk, or even a painter’s drop cloth at varying distances from the camera creates a sense of depth and texture without revealing the context of the room. You can also apply color theory, using a background color that complements your outfit to create visual harmony. For example, a blue outfit will pop against warm, orange-toned fabrics. Another advanced technique is using a wide-angle lens close to a textured surface, like a peeling paint wall or a concrete floor. This “forced perspective” makes a small area appear vast and abstract, turning a simple corner of your home into a dynamic set.
Finally, introduce narrative props intentionally. A stack of vintage books can suggest an intellectual theme, while wilting flowers might evoke a sense of beautiful decay. Every element in the frame should feel deliberate. By controlling the background, you are demonstrating a higher level of creative direction—a skill that signals to clients that you are more than just a face, but a creative collaborator.
Why Professional Photos Are a Waste of Money for Your First Agency Submission?
When first approaching modeling agencies, many aspiring models believe they need a portfolio of highly produced, professional photos. This often leads to spending hundreds or even thousands of dollars on a photographer before ever securing representation. This is a common and costly misconception. Agencies are not looking for a finished product; they are looking for potential. They want to see your raw, natural features to gauge your versatility and see how you might fit their roster of clients. Overly produced, retouched, or stylized photos can actually work against you by hiding your bone structure, skin texture, and true look.
As one industry expert from a top agency’s submission guidelines states, the focus should be on clarity, not production value. This insight is critical for new models, and a guide on editorial photography with an iPhone echoes this sentiment:
Agencies want to see raw, moldable looks through digitals and polaroids, not finished products. Overly produced photos can hide the person’s true features and suggest they are not versatile.
– Industry Expert, Fashion Agency Submission Guidelines
What agencies require are called “digitals” or “polaroids.” These are simple, clean shots taken in natural light with minimal makeup and a simple outfit. Their purpose is to show you as a blank canvas. You can and should shoot these yourself using your iPhone and the techniques discussed in this guide. Mastering natural light and taking a clean, well-focused shot demonstrates technical competence, while the unretouched nature of the photos gives agencies exactly what they need to see. Investing your time in learning to take great digitals is far more valuable than investing your money in a premature professional shoot.
Action Plan: Your DIY Agency Submission Kit
- Clean Headshot: Shoot against a plain white wall using soft, natural window light. Wear minimal makeup and maintain a neutral expression to clearly show your facial features.
- Full Body Shot: Wear a simple, form-fitting outfit (like a black tank top and jeans). Stand straight to clearly show your body proportions and posture.
- Profile Shot: Take a side-angle shot of both your face and full body to demonstrate your bone structure, jawline, and posture from a different perspective.
- Editorial Style Shot 1: Use the skills from this guide to create a creative shot that showcases your personality and ability to convey a mood or movement.
- Editorial Style Shot 2: Produce a second, different creative shot to demonstrate your range and versatility, perhaps with a different lighting setup or emotional tone.
Thrifting and Returns: How to Style a High-Fashion Shoot for Under $50?
Styling is a critical component of an editorial shoot, but a high-fashion look doesn’t require a high-fashion budget. The key to styling on a shoestring is resourcefulness and a surgical approach to shopping. Instead of aimlessly browsing, start with a detailed mood board. This will guide your acquisitions and prevent impulse buys. The most effective strategy is the “One Statement Piece” method. Invest the majority of your small budget ($30-40) on a single, striking item from a thrift store, such as a vintage architectural coat, a structured blazer, or a unique dress. This piece will become the anchor of your entire look.
With the statement piece secured, build the rest of the outfit using basics from your existing wardrobe, but style them unconventionally. A simple white shirt can be worn backward, a skirt can be layered over pants, and so on. Your next stop should be the hardware store, a hidden gem for avant-garde accessories. Metal chain sold by the foot becomes a statement necklace, painter’s plastic can be draped for a transparent layering effect, and reflective aluminum tape can create geometric metallic details on the body or clothing—all for just a few dollars. This approach is about seeing the potential in everyday objects, a hallmark of a truly creative stylist.
Many thrift stores and even some retail stores have return policies that you can ethically use. If you purchase an item, keep the tags on, shoot with it carefully, and return it in perfect condition, you can effectively “rent” high-quality pieces for free. The following table illustrates how to creatively source styling elements from unconventional places.
| Budget Item | Thrift Store Option | Hardware Store Alternative | Styling Application |
|---|---|---|---|
| Statement Necklace | Vintage chains ($15-25) | Metal chain by foot ($3-5) | Layer multiple weights |
| Structured Shoulders | 80s power blazer ($20) | Foam insulation shaped ($8) | Pin under oversized shirts |
| Metallic Accents | Vintage belts ($10-15) | Reflective tape ($5) | Geometric body decoration |
| Dramatic Draping | Vintage curtains ($15) | Drop cloth ($10) | Sculptural wrapping |
Key Takeaways
- Mastering natural light is more impactful than using artificial sources like ring lights for achieving an editorial look.
- A professional editing workflow combines VSCO for mood and Lightroom for technical precision, mimicking film aesthetics.
- Treat your background and styling as active parts of your composition, using DIY techniques to create texture and narrative.
Instagram as a Composite Card: How to Audit Your Profile for Clients?
In today’s industry, your Instagram profile is often the first and most important portfolio a client or agency will see. It’s a living, breathing composite card (“comp card”) that showcases not just your look, but your brand, your creativity, and your understanding of aesthetics. Simply posting random snapshots is a missed opportunity. To attract professional work, you must curate your feed with the same intentionality as a gallery curator. This starts with auditing your profile from a client’s perspective. Does it tell a cohesive story? Does it demonstrate your range? Is the quality consistent?
The “9-grid” view of your profile is your first impression. The images should work together to create a harmonious aesthetic in terms of color palette, lighting, and mood. This doesn’t mean every photo must be identical, but they should feel like they belong to the same body of work. Social media analytics confirm this approach, showing that profiles with cohesive 9-grid aesthetics see 23% higher engagement from potential clients. This cohesion signals a strong, professional brand identity.
Your audit should involve asking critical questions. Is there a good mix of headshots, full-body shots, and editorial-style images? Are you showcasing different expressions and moods? Archive or delete any old, low-quality, or off-brand photos that don’t align with the professional image you want to project. Your bio should be concise and professional, stating that you are a model and including key stats (if comfortable) and contact information. Use your story highlights to categorize your work (e.g., “Digitals,” “Beauty,” “Movement,” “BTS”). By treating your Instagram as a strategic business tool, you transform it from a personal account into a powerful client-acquisition machine.
Start today by applying these technical and strategic principles. Audit your Instagram profile, plan a shoot using natural light, and begin building a portfolio that truly represents your potential as a professional model.