In summary:
- Stop defaulting to the center of the frame; your body is a tool to create balanced, dynamic compositions using the rule of thirds.
- Master geometric shapes, especially triangles with your limbs, to add structure and direct the viewer’s eye.
- Use your arms and gaze to create leading lines that guide focus toward the product or key elements.
- Control negative space around your silhouette to define the mood and add visual impact to the photograph.
- Analyze the frame on a tethered screen not just for your look, but for your body’s relationship to the overall composition.
Many models believe their primary job is to look good. They enter a set, find the center of the frame, and strike a pose. They practice S-curves and master a confident expression, assuming that’s the entirety of their role. While confidence is crucial, this self-centered approach fundamentally misunderstands the art of fashion photography. The model is not merely the subject; the model is an integral part of the image’s architecture.
The most common advice—”know your angles,” “be confident”—falls short because it ignores a critical partner in the creative process: the frame itself. The space you occupy, and more importantly, the space you *don’t* occupy, dictates the entire visual narrative. It’s the difference between a static portrait and a dynamic, compelling story. This is where a deeper understanding of composition, starting with the rule of thirds, becomes a model’s most powerful, yet often overlooked, skill.
But what if the key wasn’t just knowing your best side, but understanding how to use your body as a geometric tool? This guide moves beyond generic posing tips. We will deconstruct your body into a series of lines, shapes, and vectors that you can use to actively build a better photograph. You will learn to control leading lines with your arms, create powerful shapes with your limbs, and use negative space as deliberately as a sculptor uses clay. By the end, you will no longer be a passive subject waiting to be captured; you will be an architect of the image.
This article provides a structured approach to transforming your posing from static to strategic. Below is a summary of the geometric principles and practical techniques we will explore to help you become an indispensable compositional asset on any shoot.
Summary: A Model’s Guide to Spatial Architecture
- How to Use Your Arms to Direct the Viewer’s Eye to the Product?
- Why You Should Never Cut Off Your Own Hands at the Wrist in a Frame?
- Posing for Layout: Where to Leave Space for the Magazine Title?
- Symmetry or Chaos: Which Composition Style Fits the Brand Vibe?
- The “Hero” Angle: How to Elongate Your Legs for Low-Angle Shots?
- How to Create Triangles With Your Limbs for Stronger Composition?
- The Tethered Shoot: How to Use the Screen to Improve Your Next Frame?
- How to Create Dynamic Shapes Using Negative Space in Fashion Photography?
How to Use Your Arms to Direct the Viewer’s Eye to the Product?
Your arms are not just appendages; they are powerful directorial tools. In commercial and fashion photography, their primary function is to serve as vectors that guide the viewer’s gaze. When a product is the hero of the shot—be it a watch, a handbag, or a specific detail on a garment—your arms must create invisible lines that point directly to it. The goal is to make the viewer’s journey to the product feel natural and subconscious.
One of the most effective methods is creating “funnel lines.” By positioning both arms so they converge toward the product, you build a visual funnel. This doesn’t mean pointing stiffly. Softly bent elbows and relaxed hands are key. Another advanced method is the “frame technique,” where you use your elbows and hands to form an internal boundary around the featured item, isolating it and giving it prominence. This transforms your limbs into a secondary frame within the main composition.
The intensity of your arm positioning must also align with the brand’s voice. A subtle wrist angle might be perfect for a luxury brand emphasizing quiet elegance. In contrast, a dynamic, pointed gesture can convey energy and excitement for a commercial client. As a final touch, aligning your gaze with the angle of your forearm creates a powerful, unified line of sight that leaves no doubt about the image’s focal point. Placing a hand on the clothing can further enhance this connection, drawing attention to texture and fit while making the pose feel more engaged and cohesive.
Why You Should Never Cut Off Your Own Hands at the Wrist in a Frame?
In the geometric language of a photograph, every part of the body is a complete shape. Cutting off a hand at the wrist is a compositional amateurism that creates a jarring visual stop. It breaks the flow of the lines your limbs create and suggests incompleteness. A viewer’s eye follows the line of an arm expecting to find its conclusion—the hand. When it’s abruptly cropped, it creates a sense of unease and distracts from the image’s subject. Professional models understand this intuitively; insights from the industry show that in 90% of successful poses, the hands remain fully visible and integrated.
To avoid this, you must treat your hands as the elegant conclusion to the vector of your arm. They should always be positioned with intention. The key is to avoid awkwardness by maintaining relaxed, natural curves. Stiff, straight fingers or a clenched “claw” hand immediately signals tension. Think of ballet-like positions, where fingers are elongated but softly separated. The most flattering angle is often achieved by keeping your pinky finger toward the camera, which slims the hand’s appearance.
The wrist is a critical joint for creating dynamic lines. Bending your wrist slightly inward or outward breaks the potentially bulky parallel line formed by the forearm and hand. This small adjustment introduces a new angle and adds a layer of sophistication to the pose. The image below highlights how keeping the hands fully in frame serves as a compositional anchor, completing the visual line and adding a point of interest.
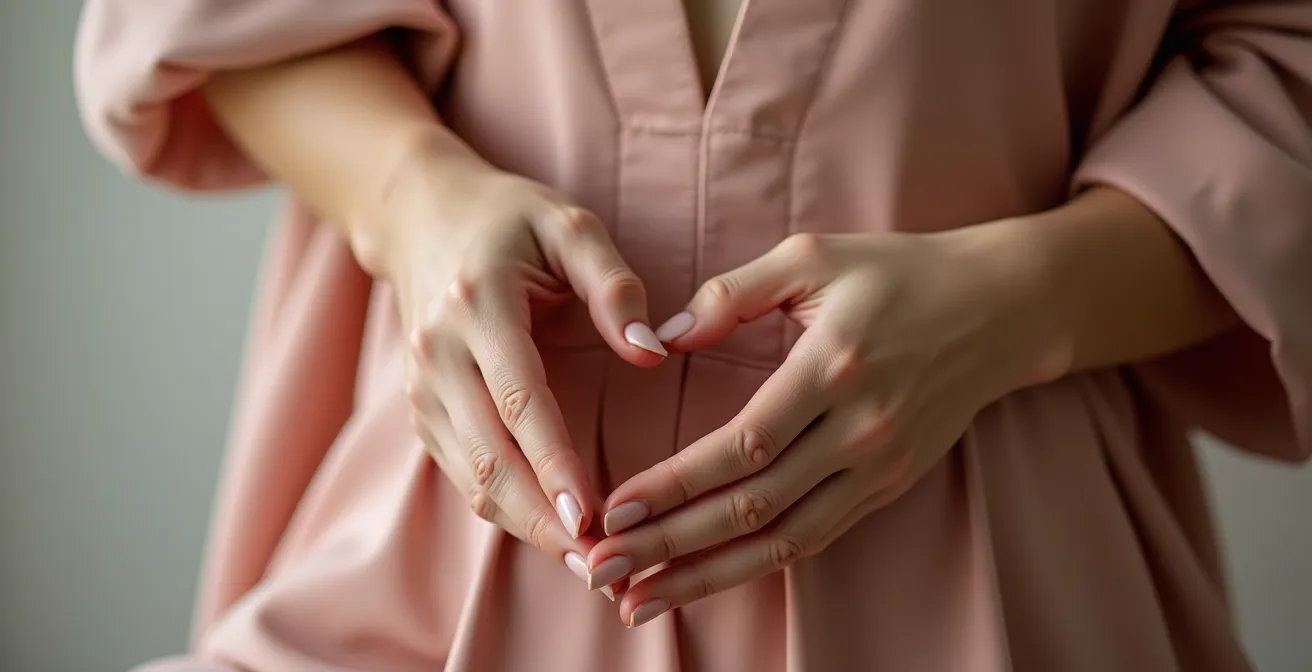
As you can see, the hands are not an afterthought; they are a focal point. They interact with the fabric, complete the arm’s gesture, and provide a graceful endpoint for the viewer’s eye. By ensuring your hands are always visible and thoughtfully placed, you maintain the compositional integrity of the entire pose.
Posing for Layout: Where to Leave Space for the Magazine Title?
A model working in print media is not just creating a beautiful image; they are creating a functional one. A magazine cover or editorial spread is a complex composition that includes text, logos, and headlines. Your pose must anticipate and accommodate these elements. The most common mistake is to create a perfectly balanced, self-contained pose that leaves no room for the graphic designer to work. This is where the concept of posing for negative space becomes a highly valuable professional skill.
You must learn to see the empty areas you are creating with your body as intentional, usable space. For a magazine cover, the top third of the frame is prime real estate for the masthead (the magazine’s title). A pose that fills this area with a raised arm or head is often unusable. Instead, you should aim to create shapes that reserve this space. Poses that create strong vertical or L-shaped lines are particularly effective as they naturally leave clean areas for text.
Different poses create different types of negative space, each suited for a specific layout need. Understanding these will make you a favorite of art directors. The following table breaks down common poses and their layout applications, based on an analysis of compositional needs in publishing.
| Pose Type | Best For | Negative Space Created | Typical Usage |
|---|---|---|---|
| L-Shape Pose | Magazine covers | Top third and one side clear | Title placement above, sidebar text |
| C-Shape Pose | Editorial spreads | Central curved space | Text wrap around figure |
| Vertical Line | Feature articles | One full side open | Text column placement |
By consciously choosing an L-shape for a potential cover shot or a C-shape for an internal spread, you demonstrate a high level of professionalism. You are no longer just a model; you are a collaborator in the final product, showing an awareness of the entire media ecosystem, not just the photograph.
Symmetry or Chaos: Which Composition Style Fits the Brand Vibe?
Every pose communicates a message. The choice between a symmetrical, centered composition and a dynamic, asymmetrical one is not arbitrary; it’s a strategic decision that should be deeply rooted in the brand’s identity. Symmetry projects stability, authority, and timelessness. Think of luxury brands, heritage tailoring, or financial institutions. A model posing for such a brand should utilize centered, balanced, and powerful stances. The body is presented as a solid, reliable structure, reinforcing the brand’s core values.
Conversely, asymmetry—or controlled chaos—conveys energy, innovation, and rebellion. This is the visual language of streetwear, tech startups, and athletic brands. Here, the model should break the frame’s equilibrium with diagonal lines, off-kilter angles, and poses that imply movement. The body becomes a disruptive force, challenging convention and creating visual excitement. As the Style Rave fashion editorial team notes, “Depending on the vibe of the shoot, a model’s body language can say so much—whether that’s power, grace, or even vulnerability.” Your compositional choices are the primary way you express that language.
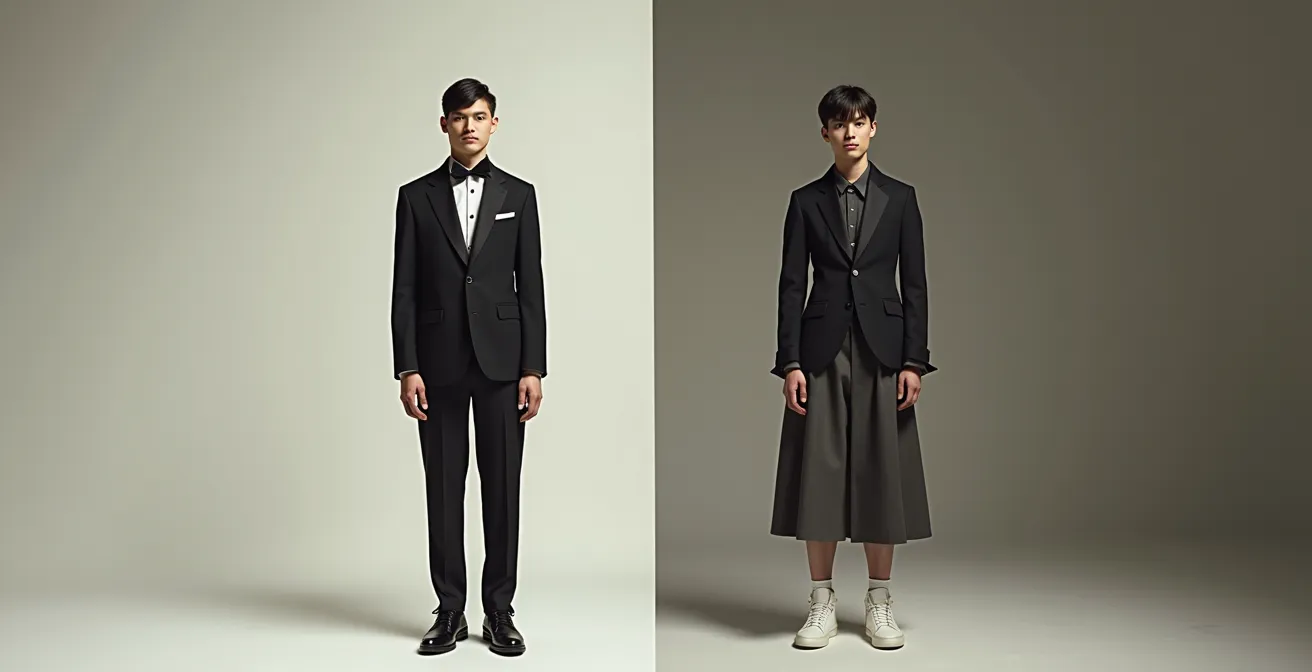
A hybrid approach also exists, often used by brands that are established yet innovative. This involves creating a symmetrical core with the torso while using asymmetrical limbs to introduce dynamism. The following guide, inspired by a breakdown of brand alignment in photography, provides a clear framework for matching your posing style to the client’s message.
| Composition Style | Brand Keywords | Industry Examples | Visual Effect |
|---|---|---|---|
| Symmetrical | Heritage, Luxury, Trust, Authority | Finance, High-end automotive, Classic tailoring | Stability, power, timelessness |
| Asymmetrical/Chaos | Disruptive, Innovative, Dynamic | Streetwear, Tech, Athletic wear | Energy, movement, rebellion |
| Hybrid (Symmetrical core + asymmetrical limbs) | Established yet innovative | Contemporary luxury, Tech-fashion crossover | Balance of reliability and dynamism |
Before a shoot, research the brand. Understand their keywords. Are they about “trust” or “disruption”? Your ability to translate that vibe into a geometric pose is a hallmark of a thinking model.
The ‘Hero’ Angle: How to Elongate Your Legs for Low-Angle Shots?
Low-angle shots are a classic technique to make a subject appear powerful, dominant, and literally larger-than-life. However, for a model, this angle can be tricky. Without the right technique, it can shorten the body or create awkward proportions. The key to mastering the low-angle shot is not just to stand there, but to actively use your legs to manipulate perspective and create an illusion of extreme length. This is achieved through what can be called the “Tripod Principle.”
Instead of keeping your feet together, you create a stable and elongating base with three points of contact. Position one leg—the “hero” leg—pointed directly toward the camera lens. The other leg should be angled back to create depth and support. By placing the foot of the hero leg significantly closer to the low-angle lens, you leverage forced perspective. Objects closer to the lens appear larger, and this simple placement can dramatically stretch the appearance of your leg.
The real secret, however, lies in the hips. A common mistake is to only point the toe. For maximum elongation, you must tilt the hip of the forward “hero” leg slightly upward toward the camera. This micro-adjustment extends the line of the leg from the very top. When wearing pointed-toe shoes, this creates a seamless “infinity line” from hip to toe, maximizing the visual effect. For bulkier shoes like boots or sneakers, angling the foot slightly away from the camera can prevent it from looking clunky and visually shortening the leg. As noted in a professional guide to posing for full-length shots, these small adjustments are what elevate a good shot to a great one.
How to Create Triangles With Your Limbs for Stronger Composition?
If there is one geometric shape that a model must master, it is the triangle. Triangles are inherently dynamic and stable, and they are the secret weapon for creating strong, compelling compositions. The human eye is naturally drawn to them, and they provide a clear structure within the frame. It’s no surprise that a review of professional work reveals that over 75% of successful fashion poses incorporate triangular shapes in some form. Your body is a collection of joints that can be used to create an endless variety of them.
The most obvious way to form a triangle is with your arms. Placing a hand on your hip creates a classic, powerful triangle between your arm, your torso, and your waistline. This is a closed triangle, which conveys stability and confidence. An open triangle, formed by raising an arm overhead or extending it out, suggests freedom, aspiration, and movement. These shapes direct energy within the frame and prevent the silhouette from becoming a static block.
You can also create more complex compositions by stacking or interlocking triangles. For instance, one arm on a hip and one leg bent creates two distinct triangles that add sophistication, a common technique in high-fashion. But the most advanced application is the creation of ‘invisible’ triangles. These are formed between non-connected points of the body, such as the eyes, an elbow, and a knee. While the lines aren’t physically there, the brain connects these three focal points, creating a compositional path that guides the viewer’s gaze through the image in a deliberate sequence. You can even use elements in the environment—a piece of furniture, a prop, or the horizon line—as the third side of a triangle, seamlessly integrating your pose into the scene.
The Tethered Shoot: How to Use the Screen to Improve Your Next Frame?
A tethered shoot, where images appear on a screen moments after being taken, is a model’s greatest tool for real-time self-correction. Too often, models use this opportunity for vanity—checking their hair or makeup. A professional model uses it for compositional analysis. The screen is your direct feedback loop for understanding how your geometric shapes are interacting with the photographer’s frame. It’s your chance to move from being the subject to being a co-director of the image.
The first step is to develop a rapid review method. You only have a few seconds to glance at the screen before the next shot. In that time, you must assess three things: composition, energy, and connection. First, check the composition: Is your body creating balanced visual weight? Are you accidentally creating tangents where your arm lines up perfectly with a background element? Second, assess the energy: Does the pose feel static and dead, or is it alive with dynamic tension? If it feels flat, you know to introduce more angles in the next shot. Third, evaluate the connection: Are your eyes engaging with the intended focal point? Does your expression match the brand’s vibe?
To make this process collaborative, learn to speak the photographer’s language. Instead of saying, “I don’t like that one,” offer constructive, technical feedback like, “I see my arm is creating a tangent with the window frame; I’ll adjust.” This shows you understand composition. A key professional tip is to move slightly with every click of the camera. Even a small head tilt or a shift in weight creates a new variation, giving the editor more options and preventing a static set of images. By pre-empting the photographer’s crop and observing how they frame the shot, you can adjust your pose to better fit their vision, proving you are an active and aware partner.
Your 5-Point Self-Correction Checklist
- Body Position: Is my body placed effectively according to the rule of thirds, or am I defaulting to the center?
- Geometric Shapes: Am I actively creating triangles or other strong shapes with my limbs, or is my silhouette passive?
- Negative Space: Is the space around my body interesting and intentional, or is it accidental?
- Leading Lines: Are my arms, legs, and gaze directing the eye toward the intended focal point?
- Energy and Flow: Does my pose have dynamic tension, or does it look static and stiff?
Key takeaways
- Your body is an architectural tool; use it to build the composition, not just inhabit it.
- Triangles are the foundation of strong posing. Create them with your arms, legs, and even invisible lines between key points.
- The space around you (negative space) is as important as your pose itself. Sculpt it with intention.
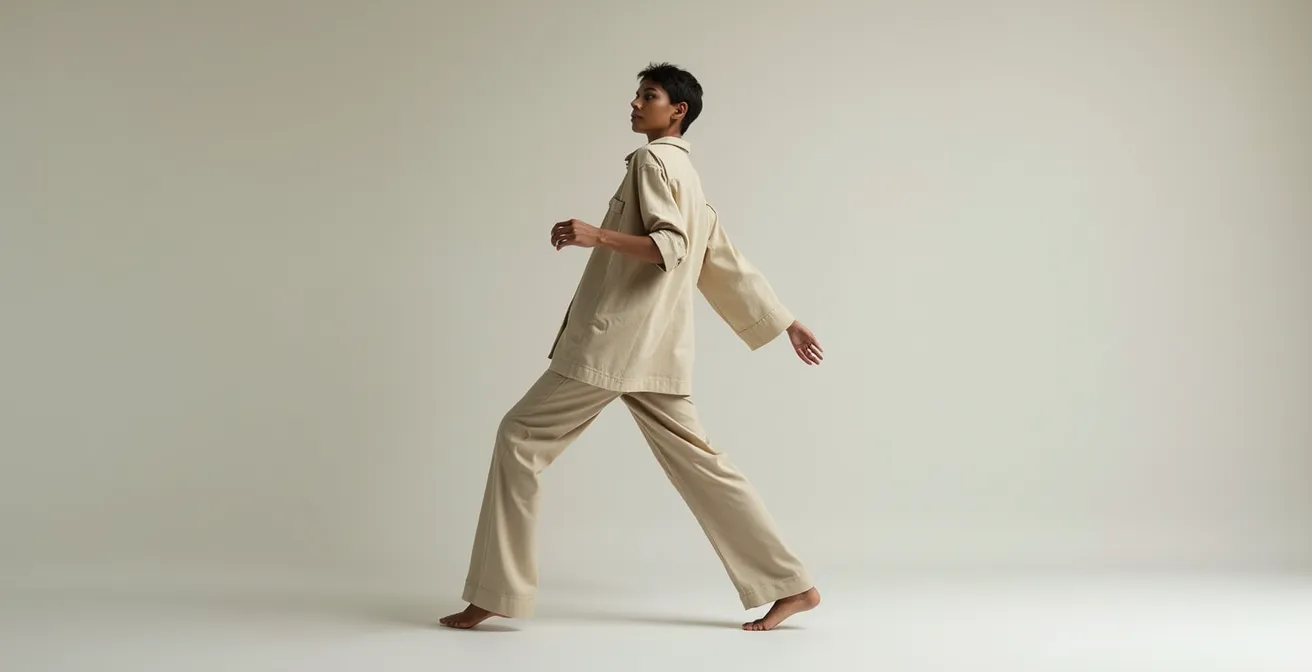
How to Create Dynamic Shapes Using Negative Space in Fashion Photography?
The most advanced models understand a profound compositional secret: what is not there is just as important as what is. Negative space—the empty area around and between your body—is not dead space. It is an active compositional element that defines your silhouette, directs attention, and creates mood. By consciously shaping the negative space, you move from simply posing your body to sculpting the entire frame. As noted in an exploration of advanced photographic techniques, negative space provides contrast that draws attention to the main subject and allows for immense creative expression.
Think of your silhouette as a cookie-cutter. The shape of the cookie is your body (the positive space), but the shape of the leftover dough (the negative space) is equally defined. Widening your stance, extending an arm, or arching your back drastically alters the shape of the negative space around you. An open, expansive pose with lots of negative space can evoke feelings of freedom, lightness, and minimalism. A compressed pose with very little negative space can create a sense of tension, intimacy, or claustrophobia. Your job is to control that emotional output.
A classic example of this in action is using a minimalist background to highlight a bold outfit. By creating a strong, clear silhouette, the negative space around you acts as a quiet canvas, forcing the viewer’s eye onto the clothing and the pose. A dynamic composition can be achieved by leaning diagonally across the frame; the triangular shapes of negative space you create in the corners will add energy and movement to the photograph. You are actively designing the visual flow, giving the photographer a much stronger foundation to work with. It is the ultimate expression of a model’s control over the entire image.
Your next step is to consciously apply one of these geometric principles in your very next shoot. Choose one—triangles, negative space, or leading lines—and focus on it exclusively. This deliberate practice is how you transform theory into instinct and become an architect of the frame.