The “no-makeup” look for castings has nothing to do with looking ‘natural’ and everything to do with a technical mastery of how products react to a camera’s flash.
- Your bathroom mirror lies; a Polaroid flash reveals everything, from mismatched foundation to muddy contour.
- Success isn’t about hiding flaws but about enhancing your unique bone structure for the camera.
Recommendation: Stop thinking like a beauty enthusiast and start thinking like a technician. Master how to make your features translate through a lens, not just look good in person.
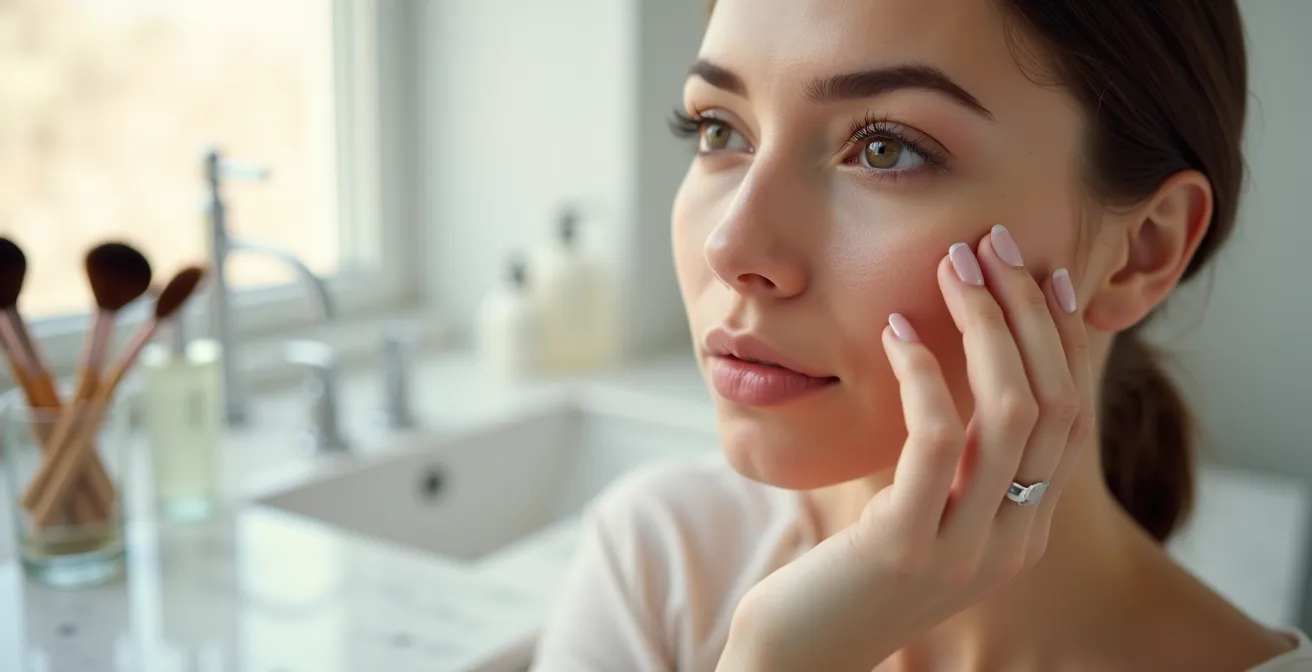
You’ve been there. You spend an hour crafting the perfect “no-makeup” makeup look. In your bathroom mirror, you see fresh, flawless skin and subtly defined features. You feel confident. Then, you get the casting Polaroids back and your heart sinks. Your face looks flat, your contour looks like a dirt smudge, and your foundation is a completely different color from your neck. What went wrong? The mistake is thinking that casting makeup is about looking pretty in person. It’s not. It’s a highly technical skill designed to do one thing: present your unique features as a clean, clear canvas under the harshest, most unforgiving lighting conditions imaginable.
Most models fail because they follow standard beauty advice, which is designed for ambient, flattering light. A casting director’s flash, however, is a truth serum. It erases soft shadows, amplifies texture, and desaturates color in unpredictable ways. This guide is not another generic tutorial. This is a technical manual from a makeup artist trainer. We will dissect why your makeup fails and provide the professional, technique-driven solutions to ensure that what the camera sees is your best, most authentic self. It’s time to master the science of the casting face, focusing on structural integrity and pigment translation, not just covering blemishes.
This article provides a complete breakdown of the professional techniques required for a successful casting look. We’ll explore everything from flash-proofing your makeup to understanding the specific requirements of different types of castings. Below is a summary of the key areas we will cover to help you master your application.
Summary: The Technical Guide to Casting-Ready Makeup
- Why Your Contour Looked Good in the Mirror but Muddy in the Polaroid?
- The Jawline Test: How to Match Your Foundation to Your Neck, Not Your Face?
- Soap Brows vs. Gel: How to Get That Model Brow Texture at Home?
- Why Your Mascara Wand Is a Ticking Time Bomb for Eye Infections?
- Individual Lashes vs. Strip: Which One Look Natural Enough for Castings?
- Why You Must Wear Zero Makeup to a High Fashion Polaroid Session?
- Why Red Lipstick Looks Like Black Holes in Black and White Photography?
- How to Ensure You Get the Hero Shot Before the Light Fades?
Why Your Contour Looked Good in the Mirror but Muddy in the Polaroid?
The primary culprit behind a perfect mirror contour turning into a muddy mess on camera is the flash. Direct, harsh flash from a Polaroid or digital camera fundamentally changes how light and shadow are perceived. In your bathroom’s soft, ambient light, cream contours blend seamlessly, creating a gentle, believable shadow. However, a camera flash obliterates these subtleties. It flattens the face and can make cream products, which have a natural sheen, reflect light in a way that looks greasy or patchy. This is where the concept of pigment translation becomes critical.
Furthermore, flash photography dramatically alters color. According to industry analysis, photography experts recommend using up to 30% bolder pigment than you would for everyday wear, because the intense light washes color out. That subtle taupe contour that looked perfect in person can disappear or look ashen. For flash photography, a powder contour is almost always superior. It has a matte finish that absorbs light rather than reflecting it, ensuring the shadow you create remains a shadow on camera. The key is to apply it with pressing motions for a seamless blend that won’t look like a stripe under the flash, and always test your look with your phone’s flash before leaving home.
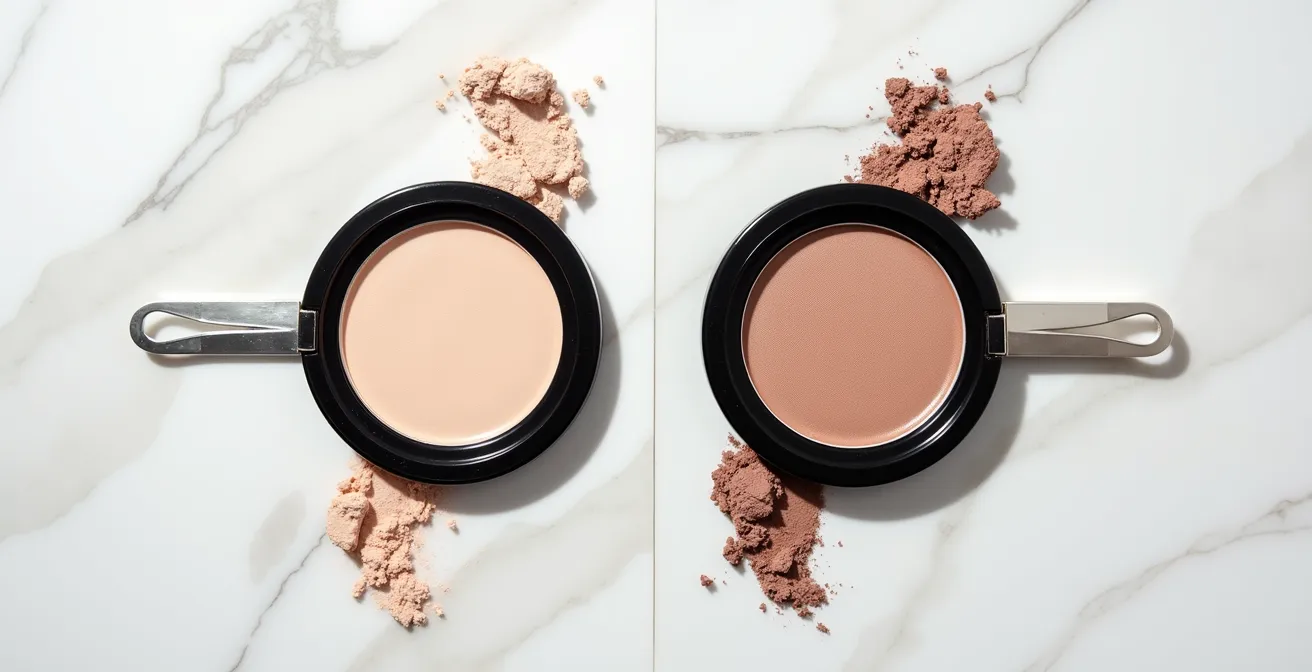
As this visual comparison demonstrates, the texture and finish of your product are just as important as the color. Under flash, the powder maintains its intended shape and depth, while the cream product loses its definition and creates unwanted shine. To prevent this, professionals “bake” with a translucent powder for 2-3 minutes over contoured areas to lock them in place and eliminate any risk of flashback. This flash-proofing technique is non-negotiable for castings.
The Jawline Test: How to Match Your Foundation to Your Neck, Not Your Face?
One of the most common and jarring mistakes at a casting is a face that doesn’t match the body. Many models match their foundation to the skin on their cheek or forehead, which is often slightly darker or redder due to sun exposure. The professional standard is the Jawline Test. Apply three small stripes of potential foundation shades along your jawline, blending slightly downwards onto your neck. The shade that disappears seamlessly into both your face and your neck is the correct one. Your neck receives less sun and is the true baseline for your body’s overall skin tone. This creates a cohesive look from head to toe, which is exactly what casting directors need to see.
The formula of your foundation is just as crucial as the color. Casting directors are not looking for a “perfected” face; they are examining your actual skin tone, bone structure, and facial symmetry. Therefore, a light, breathable foundation is essential. The goal is to find a formula that evens out minor discoloration without masking your natural features like freckles or the micro-texture of your skin. You want the foundation to disappear, providing just enough coverage to create a clean, uniform canvas. Heavy, full-coverage formulas look like a mask under a flash and suggest you have something to hide.
Understanding how different finishes perform under various lighting conditions is key to selecting the right product for a casting, where you might encounter anything from natural light to a harsh studio flash.
| Foundation Type | Natural Light | Flash Photography | Best For |
|---|---|---|---|
| Full Coverage | Can look heavy | Photographs well | Professional shoots |
| Satin Finish | Natural appearance | Perfect balance | Most situations |
| Dewy Finish | Fresh glow | Can amplify shine | Golden hour only |
| Matte Finish | Can appear flat | Controls shine well | Midday sun shoots |
As the table shows, a satin finish offers the most versatility and is the safest bet for a casting. It provides a natural appearance in person while still controlling shine and looking balanced under a flash. A matte finish is a close second, but can sometimes make the skin look flat or lifeless if not applied with a very light hand.
Soap Brows vs. Gel: How to Get That Model Brow Texture at Home?
The “model brow”—fluffy, textured, and perfectly held in place—is a casting staple. It frames the face and enhances structural integrity without adding any pigment. The two most popular methods for achieving this at home are soap brows and brow gel, but they serve different purposes. The soap brow technique, which involves using a glycerin-based soap and a spoolie, creates a strongly laminated, almost-wet look with maximum hold. It’s excellent for achieving that high-fashion, slicked-up effect. However, it can sometimes flake or feel tight after several hours, making it best for shorter castings.
Brow gel, on the other hand, offers more flexibility. A strong-hold clear gel provides excellent texture and staying power without the stiffness of soap. It’s a more reliable choice for all-day castings where you need your brows to look groomed but still feel natural. As professional model Sterling Jones noted in The Beauté Study about being photographed, the reliability of a gel is paramount.
Since I am being photographed, I tend to use a brow gel for these moments only to make sure nothing moves
– Sterling Jones, The Beauté Study
The choice between them depends entirely on the specific context of the casting. For high-glare situations like flash photography, a matte-finish brow gel is superior as it prevents the light from bouncing off the hairs and creating a distracting shine. For video castings where movement is key, a light mist of hairspray on a spoolie can provide invisible, flexible hold. The ultimate goal is to enhance the natural brow texture, not to paint on a new shape.
Your Action Plan: Choosing the Right Brow Style for Any Casting
- Assess the casting type: Is it a quick go-see or an all-day event? For morning-only castings, soap brows provide maximum hold and a laminated effect.
- Consider the lighting: Will there be flash photography? If so, opt for a matte gel to prevent glare and maintain visible texture.
- Evaluate the format: For video castings, use a light mist of hairspray on a spoolie for an invisible yet durable hold.
- Check the brief: For high-fashion Polaroids, the requirement is often clean, groomed brows with absolutely no product. Don’t add what isn’t asked for.
- Plan for longevity: For long, all-day castings, a strong-hold clear gel offers the best balance of flexibility and hold without flaking.
Why Your Mascara Wand Is a Ticking Time Bomb for Eye Infections?
Beyond aesthetics, a critical component of professional makeup application is hygiene. Nothing screams “amateur” louder than poor sanitation, and the most common offender is mascara. Your mascara tube is a dark, moist environment, making it a perfect breeding ground for bacteria. Every time you pull the wand out, apply it to your lashes, and re-insert it, you are introducing bacteria into the tube. In fact, alarming medical research shows mascara can be contaminated after only 1 use. Pumping the wand in and out of the tube is even worse, as it forces air inside, which helps bacteria multiply faster.
This contamination poses a serious risk of eye infections like styes or even conjunctivitis—conditions that could take you out of work for weeks. For a model, your eyes are a key asset, and protecting them is non-negotiable. Professional makeup artists never apply a wand directly from the tube to a client. They use disposable spoolies for every single application to prevent cross-contamination. You must adopt this same standard for yourself. Using a fresh, disposable wand each time ensures you are not re-introducing bacteria into your product or onto your eye.

A professional mindset requires a professional’s toolkit. This includes not only disposable applicators but also a strict sanitation protocol. All eye makeup should be replaced every three months without exception. Brushes should be cleaned with 70% alcohol between uses, and products should be stored below 85°F (29°C) to help preserve the antimicrobial agents they contain. This isn’t just about being clean; it’s about protecting your career and demonstrating a professional level of care that casting directors and makeup artists will respect.
Individual Lashes vs. Strip: Which One Look Natural Enough for Castings?
The answer is simple: neither. For the vast majority of commercial and high-fashion castings, the rule is an unequivocal “no” to any form of false eyelashes. The “no-makeup” makeup look is the absolute standard. This means no dramatic contour, no winged liner, and most certainly, no fake eyelashes. Adding even the most “natural” looking strip or individual lashes instantly signals that you are trying to alter or enhance your features, which is the opposite of what a casting director wants to see. They need to assess your natural lash line, eye shape, and how your eyes look without embellishment.
This standard is about presenting yourself as a blank canvas. An agency, photographer, or makeup artist needs to see your raw potential and envision how they can transform you for a specific campaign. Showing up with enhancements clouds their judgment and can make you look inexperienced.
We’re encouraged to wear very minimal makeup, if any at all, to all of our auditions. This gives photographers, makeup artists, and designers an opportunity to see us as a canvas they can build their artistry on.
– Why Not Petites, My Go-To No-Makeup Makeup Look As A Model
If you feel your natural lashes are sparse or short, the solution is not to add falsies for a casting. Instead, focus on what you can do to enhance what you have. A simple lash curl is the most powerful tool in your arsenal. Curling your lashes from the root opens up the eye dramatically without adding any product. If you must use mascara, apply a single, thin coat of a waterproof formula to hold the curl, focusing on the roots rather than the tips to avoid clumping. A professional and increasingly popular alternative is a lash lift, a semi-permanent treatment that curls your natural lashes for several weeks, providing the perfect wide-eyed look without any makeup at all.
Why You Must Wear Zero Makeup to a High Fashion Polaroid Session?
While a clean “no-makeup” look is the standard for commercial castings, the rules for high fashion are even stricter. For a high-fashion Polaroid session (also known as “digitals”), the requirement is often zero visible makeup. This can be shocking for models accustomed to evening out their complexion, but the reasoning is crucial. High-fashion clients are not casting a conventionally “pretty face.” They are searching for unique, interesting, and often unconventional features. They need to see the raw material they have to work with.
As the experts at ModelManagement.com state, the focus is entirely on what lies beneath. They need to see your unadulterated bone structure, your true skin texture, any unique characteristics like scars or prominent freckles, and the natural symmetry (or asymmetry) of your face.
In high fashion, they are not casting a ‘pretty face’ but a unique structure. They need to see the raw material: bone structure, skin texture, unique features, and facial symmetry
– ModelManagement.com, How To Do Your Makeup For A Casting
Wearing even a light foundation or a touch of mascara can obscure the very details that might get you booked. A casting director for a high-fashion brand might be looking specifically for pale skin, dark under-eye circles, or a strong, angular jaw. By “correcting” these features, you could be hiding your biggest selling point. The only acceptable products are those that fall under skincare: a simple moisturizer, a non-shiny lip balm, and sunscreen. Your face should be clean, fresh, and completely transparent.
Understanding the difference between casting types is essential for a model’s career. What is expected at a commercial go-see is vastly different from the requirements of a high-fashion or beauty-focused casting.
| Casting Type | Makeup Requirement | Focus | Acceptable Products |
|---|---|---|---|
| High Fashion | Zero visible makeup | Raw bone structure | Skincare only, clear balm |
| Commercial | Clean no-makeup makeup | Approachable beauty | Light foundation, mascara |
| Beauty | Perfected natural | Flawless complexion | Full base, defined features |
| Editorial | Varies by brief | Creative potential | As directed |
Why Red Lipstick Looks Like Black Holes in Black and White Photography?
The “no red lipstick” rule for castings has a strong technical basis, especially when black and white photography is involved. How colors translate into grayscale is a phenomenon known as tonal value. Every color has an equivalent shade of gray. Bright, light colors like yellow or sky blue translate into very light grays. Dark, rich colors like navy blue or deep green translate into dark grays. Red, particularly a deep, classic red, has a very dark tonal value. In black and white, it often renders as pure black or a very deep charcoal gray.
When you wear an opaque red lipstick in a black and white photo, your lips can lose all detail, dimension, and texture, appearing as two flat, black shapes on your face—veritable “black holes.” This is incredibly distracting and completely obscures the natural shape of your mouth, which is one of the key features a casting director is assessing. Furthermore, as professional photographers note that bright strobes desaturate color, this effect can be even more pronounced under flash, flattening the appearance of the lips entirely. The goal of casting makeup is to reveal, not conceal.
The solution is not to avoid lip color entirely, but to choose colors and formulations that translate well into grayscale. Sheer or satin-finish lipsticks in shades of soft rose, berry, or peachy-nude are ideal. These colors have a mid-range tonal value, meaning they will appear as a soft, natural gray in black and white photos, adding a touch of definition without creating a harsh contrast. The best practice is to always test your lip color with your phone’s camera. Take a photo of yourself and immediately apply a black and white filter. If your lips turn black, the color is too dark. Adjust to a sheerer formula or a lighter tone until you achieve a soft, flattering gray.
Key Takeaways
- Flash-Proofing is Key: Always choose powder products over creams for contour and test your entire look with a camera flash to avoid a greasy or muddy appearance.
- Foundation is for Unifying, Not Covering: Match your foundation to your neck using the Jawline Test and opt for a breathable, satin-finish formula that evens skin tone without hiding your natural texture.
- Hygiene is Non-Negotiable: Use disposable mascara wands for every application and replace all eye makeup every three months to protect your eyes and career from infection.
How to Ensure You Get the Hero Shot Before the Light Fades?
You’ve been on set for hours. The sun is setting, the light is fading fast, and the photographer yells, “We have five minutes to get the hero shot!” There’s no time for a full makeup touch-up. This is where having an emergency, high-speed makeup protocol becomes an invaluable professional skill. In this scenario, efficiency and impact are everything. You need to identify the key features that will revive your face on camera in the shortest amount of time. The focus should be on restoring life and dimension, not on perfection.
Your 5-minute emergency kit should consist of multi-use products that can be applied quickly with your fingertips. A CC cream or tinted moisturizer can be applied in 30 seconds to even out skin tone without the precision required for foundation. A touch of concealer under the eyes and on any new blemishes takes another 45 seconds. The most impactful product is a cream blush; a quick dab on the apples of the cheeks brings instant life and health back to the face and can be blended in 20 seconds. Follow with a swipe of clear brow gel, one quick coat of waterproof mascara to redefine the eyes, and a hint of lip balm. This entire routine can be completed in under three minutes, leaving you camera-ready for that crucial final shot.
This ability to adapt is especially important when working with photographers who play with dramatic light and shadow, a common trend for creating artistic silhouettes. Whether it’s the soft, forgiving light of golden hour or the high-contrast light of midday, being able to quickly reset your face is critical. Your job is to be ready when the perfect light appears, because it won’t wait. Having this emergency protocol down to a science demonstrates your professionalism and preparedness, qualities that photographers and clients value immensely.
Mastering these technical skills is not just about looking better at one casting; it’s about building a reputation as a professional, reliable, and knowledgeable model. Start practicing these techniques today. Treat your makeup application not as a beauty routine, but as a technical rehearsal for your next big job. Your next casting director will see the difference.